

 Set up docs MCP
用于连接 ClickHouse 的官方 JavaScript 客户端。 该客户端使用 TypeScript 编写,并为客户端公开 API 提供类型定义。
它无任何依赖项,针对极致性能进行了优化,并已在多种 ClickHouse 版本和配置下完成测试 (本地部署单节点、本地部署集群以及 ClickHouse Cloud) 。
针对不同环境,提供了两个不同版本的客户端:
@clickhouse/client- 仅限 Node.js@clickhouse/client-web- 浏览器 (Chrome/Firefox) 、Cloudflare workers
使用 TypeScript 时,请确保版本至少为 4.5,该版本支持内联 import 和 export 语法。
客户端源代码可在 ClickHouse-JS GitHub 仓库 中获取。
环境要求 (Node.js)
运行客户端的环境中必须提供 Node.js。 该客户端兼容所有仍在维护中的 Node.js 发行版。
一旦某个 Node.js 版本接近生命周期结束,客户端就会停止对其提供支持,因为这类版本会被视为过期且不安全。
当前 Node.js 版本支持情况:
| Node.js 版本 | 是否支持? |
|---|---|
| 24.x | ✔ |
| 22.x | ✔ |
| 20.x | ✔ |
| 18.x | 尽力支持 |
环境要求 (Web)
该客户端的 Web 版本已在最新版 Chrome/Firefox 浏览器中经过官方测试,并且可作为依赖项用于例如 React/Vue/Angular 应用程序或 Cloudflare workers。
安装
要安装最新版的稳定版 Node.js 客户端,请运行:
npm i @clickhouse/clientWeb 版安装:
npm i @clickhouse/client-web与 ClickHouse 的兼容性
| 客户端版本 | ClickHouse |
|---|---|
| 1.12.0 | 24.8+ |
该客户端很可能也能在更早的版本上运行;不过,这类支持仅为尽力而为,不作保证。如果你使用的 ClickHouse 版本早于 23.3,请参阅 ClickHouse 安全策略 并考虑升级。
示例
我们希望通过客户端代码仓库中的 示例,涵盖客户端使用的各种场景。
概览请参见 examples README。
如果示例或下文档中的某些内容不清楚,或有所遗漏,欢迎随时联系我们。
客户端 API
除非明确另有说明,否则大多数示例同时适用于 Node.js 版和 Web 版客户端。
创建客户端实例
你可以使用 createClient 工厂按需创建任意数量的客户端实例:
import { createClient } from '@clickhouse/client' // or '@clickhouse/client-web'

const client = createClient({
  /* configuration */
})
如果您的环境不支持 ESM 模块,也可以改用 CJS 语法:
const { createClient } = require('@clickhouse/client');

const client = createClient({
  /* configuration */
})客户端实例可在实例化时进行预配置。
配置
创建客户端实例时,可以调整以下连接设置:
| Setting | Description | Default Value | See Also |
|---|---|---|---|
| url?: string | ClickHouse 实例的 URL。 | http://localhost:8123 |
URL 配置文档 |
| pathname?: string | 可选路径名,客户端解析 ClickHouse URL 后会将其附加到 URL 之后。 | '' |
带路径名的代理文档 |
| request_timeout?: number | 请求超时时间 (毫秒) 。 | 30_000 |
- |
compression?: { **response**?: boolean; **request**?: boolean } |
启用压缩。 | - | 压缩文档 |
| username?: string | 发出请求时所代表的用户名。 | default |
- |
| password?: string | 用户密码。 | '' |
- |
| application?: string | 使用 Node.js 客户端的应用程序名称。 | clickhouse-js |
- |
| database?: string | 要使用的数据库名称。 | default |
- |
| clickhouse_settings?: ClickHouseSettings | 应用于所有请求的 ClickHouse settings。 | {} |
- |
log?: { **LoggerClass**?: Logger, **level**?: ClickHouseLogLevel } |
客户端内部日志配置。 | - | 日志文档 |
| session_id?: string | 可选的 ClickHouse 会话 ID,会随每个请求一起发送。 | - | - |
keep_alive?: { **enabled**?: boolean } |
在 Node.js 和 Web 版本中默认启用。 | - | - |
http_headers?: Record<string, string> |
发往 ClickHouse 请求的附加 HTTP 请求头。 | - | 带身份验证的反向代理文档 |
| roles?: string | string[] | 要随发出请求附带的 ClickHouse 角色名称。 | - |
Node.js 专用配置参数
| 设置 | 说明 | 默认值 | 另见 |
|---|---|---|---|
| max_open_connections?: number | 每个主机允许打开的最大套接字连接数。 | 10 |
- |
tls?: { **ca_cert**: Buffer, **cert**?: Buffer, **key**?: Buffer } |
配置 TLS 证书。 | - | TLS 文档 |
keep_alive?: { **enabled**?: boolean, **idle_socket_ttl**?: number } |
- | - | Keep-Alive 文档 |
| http_agent?: http.Agent | https.Agent Experimental |
为客户端自定义 HTTP agent。 | - |
| set_basic_auth_header?: boolean Experimental |
将基本身份验证凭据设置到 Authorization 请求头中。 |
true |
HTTP agent 文档中的此设置用法 |
URL 配置
大多数客户端实例参数都可以通过 URL 配置。URL 格式为 http[s]://[username:password@]hostname:port[/database][?param1=value1¶m2=value2]。在绝大多数情况下,某个参数的名称都对应其在配置选项接口中的路径,但也有少数例外。支持以下参数:
| Parameter | Type |
|---|---|
pathname |
任意字符串。 |
application_id |
任意字符串。 |
session_id |
任意字符串。 |
request_timeout |
非负数。 |
max_open_connections |
大于零的非负数。 |
compression_request |
布尔值。见下文 (1) |
compression_response |
布尔值。 |
log_level |
允许的值:OFF、TRACE、DEBUG、INFO、WARN、ERROR。 |
keep_alive_enabled |
布尔值。 |
clickhouse_setting_* or ch_* |
见下文 (2) |
http_header_* |
见下文 (3) |
(仅限 Node.js) keep_alive_idle_socket_ttl |
非负数。 |
- (1) 对于布尔值,有效值为
true/1和false/0。 - (2) 任何带有
clickhouse_setting_或ch_前缀的参数,都会移除该前缀,并将剩余部分添加到客户端的clickhouse_settings中。例如,?ch_async_insert=1&ch_wait_for_async_insert=1等同于以下配置:
createClient({
  clickhouse_settings: {
    async_insert: 1,
    wait_for_async_insert: 1,
  },
})注意:clickhouse_settings 的布尔值在 URL 中应以 1/0 形式传递。
- (3) 与 (2) 类似,不过是用于
http_header配置。例如,?http_header_x-clickhouse-auth=foobar等价于:
createClient({
  http_headers: {
    'x-clickhouse-auth': 'foobar',
  },
})
建立连接
获取连接信息
要通过 HTTP(S) 连接到 ClickHouse,你需要以下信息:
| Parameter(s) | Description |
|---|---|
HOST and PORT |
通常,使用 TLS 时端口为 8443;不使用 TLS 时端口为 8123。 |
DATABASE NAME |
默认情况下,存在一个名为 default 的数据库。请使用你要连接的数据库名称。 |
USERNAME and PASSWORD |
默认情况下,用户名为 default。请根据你的使用场景使用相应的用户名。 |
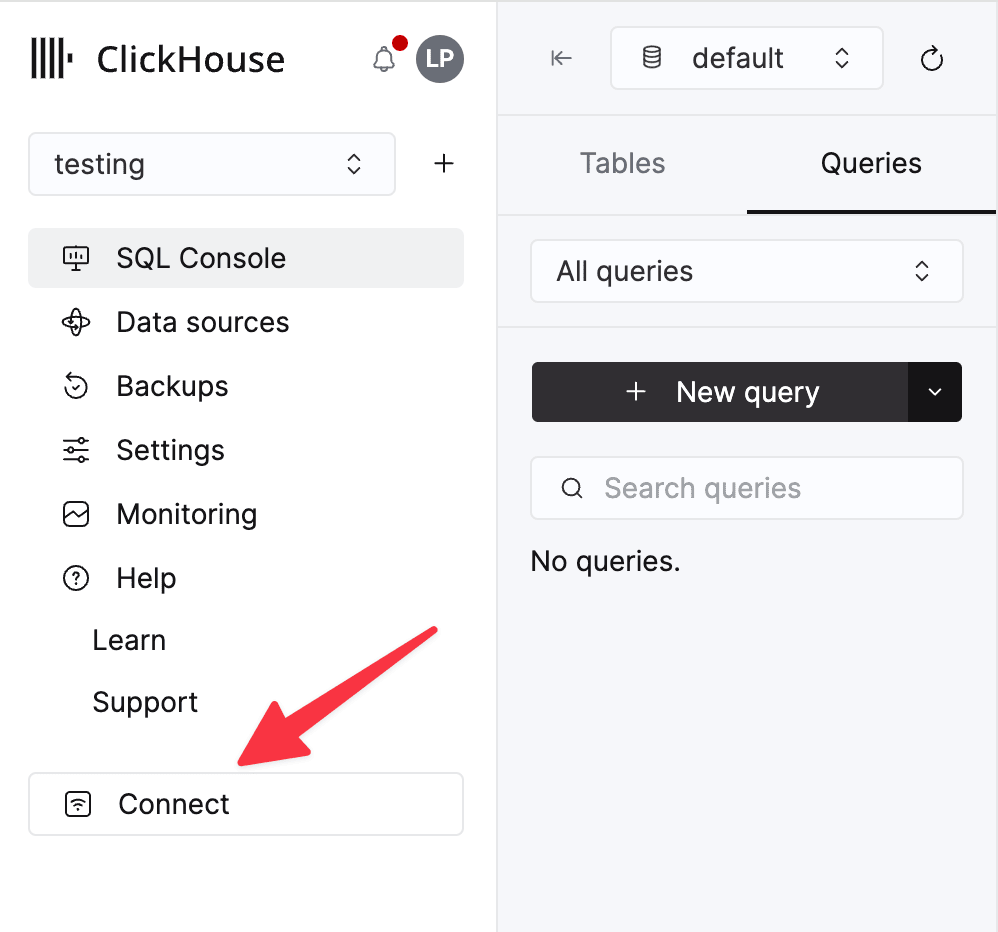
你的 ClickHouse Cloud 服务的连接信息可在 ClickHouse Cloud 控制台中查看。 选择一个服务,然后点击 Connect:
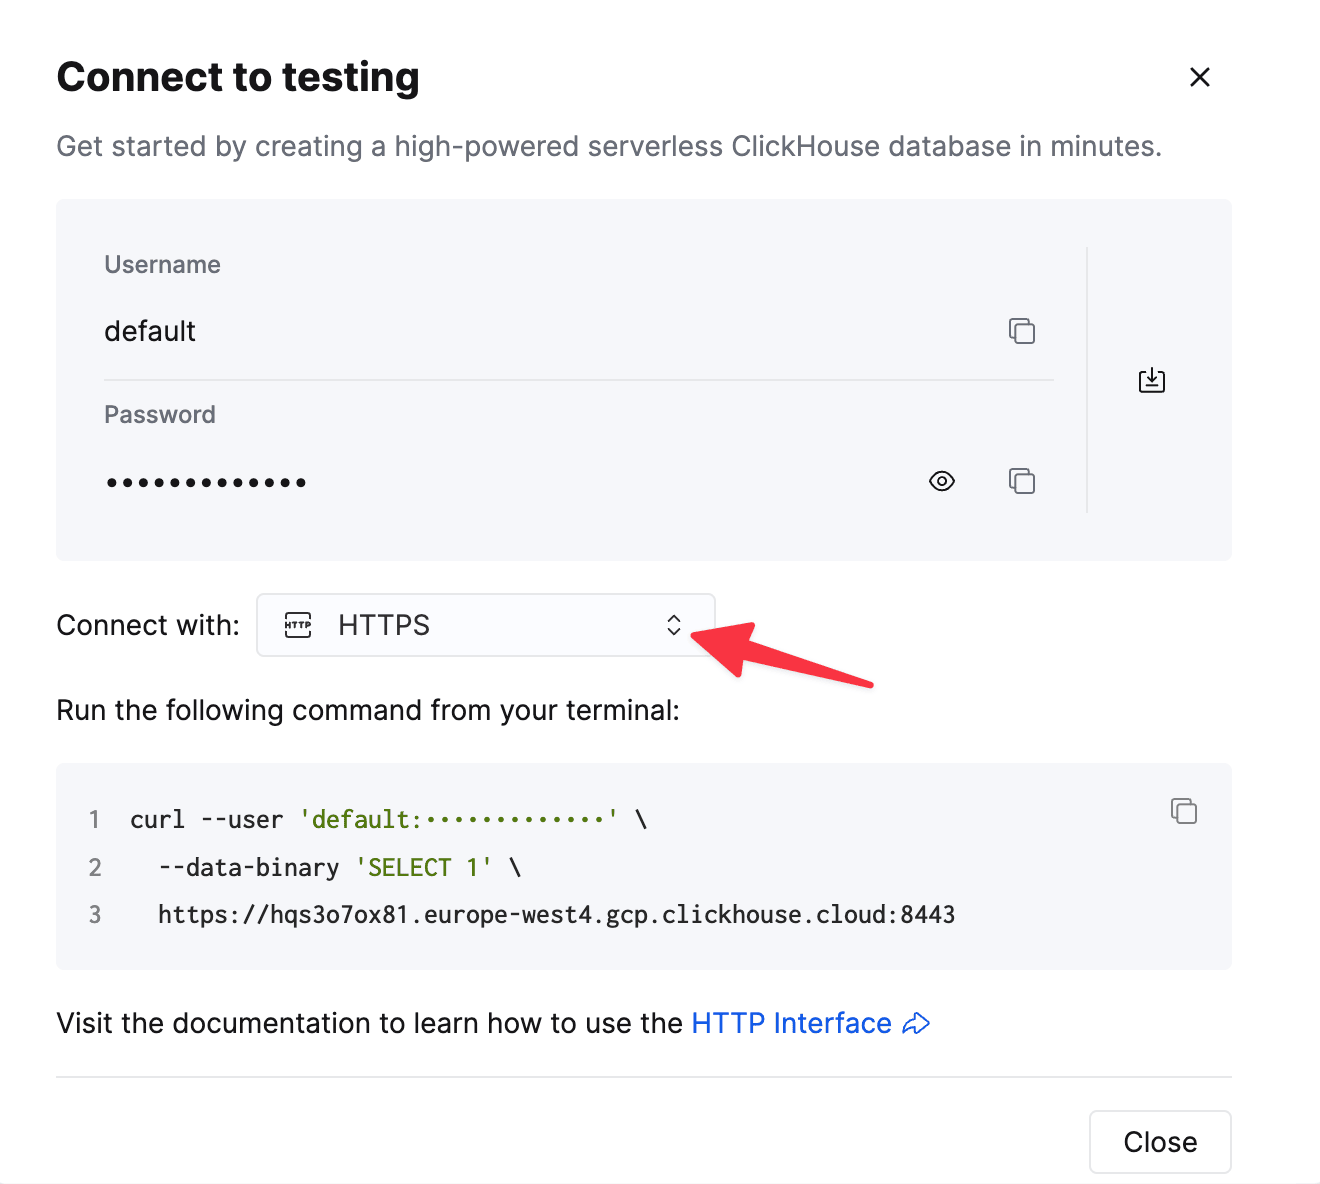
选择 HTTPS。连接信息会显示在示例 curl 命令中。
如果你使用的是自管理 ClickHouse,则连接信息由你的 ClickHouse 管理员配置。
连接概览
该客户端通过 HTTP 或 HTTPS 协议进行连接。RowBinary 支持正在推进中,参见相关 issue。
以下示例演示了如何连接到 ClickHouse Cloud。示例假定已通过环境变量指定 url (包括
协议和端口) 和 password 值,并使用 default 用户。
**示例:**使用环境变量作为配置创建 Node.js 客户端实例。
import { createClient } from '@clickhouse/client'

const client = createClient({
  url: process.env.CLICKHOUSE_HOST ?? 'http://localhost:8123',
  username: process.env.CLICKHOUSE_USER ?? 'default',
  password: process.env.CLICKHOUSE_PASSWORD ?? '',
})客户端代码仓库包含多个使用环境变量的示例,例如在 ClickHouse Cloud 中创建表、使用异步插入等,还有不少其他示例。
连接池 (仅限 Node.js)
为避免每次请求都建立连接带来的额外开销,客户端会创建一个到 ClickHouse 的连接池,利用 Keep-Alive 机制进行复用。默认情况下,Keep-Alive 处于启用状态,连接池大小设为 10,但你可以通过 max_open_connections 配置选项 进行更改。
除非用户将 max_open_connections 设为 1,否则无法保证连接池中的同一个连接会用于后续查询。这种情况很少需要,但在用户使用临时表时可能是必需的。
另请参阅:Keep-Alive 配置。
查询 ID
每个发送查询或语句的方法 (command、exec、insert、select) 都会在结果中返回 query_id。这个唯一标识符由客户端为每个查询分配;如果在服务器配置中启用了 system.query_log,它可用于从中获取数据,
也可用于取消长时间运行的查询 (参见该示例) 。如有需要,用户也可以在 command/query/exec/insert 方法的 params 中覆盖 query_id。
Base parameters for all client methods
有几个参数适用于所有 client 方法 (query/command/insert/exec) 。
interface BaseQueryParams {
  // ClickHouse settings that can be applied on query level.
  clickhouse_settings?: ClickHouseSettings
  // Parameters for query binding.
  query_params?: Record<string, unknown>
  // AbortSignal instance to cancel a query in progress.
  abort_signal?: AbortSignal
  // query_id override; if not specified, a random identifier will be generated automatically.
  query_id?: string
  // session_id override; if not specified, the session id will be taken from the client configuration.
  session_id?: string
  // credentials override; if not specified, the client's credentials will be used.
  auth?: { username: string, password: string }
  // A specific list of roles to use for this query. Overrides the roles set in the client configuration.
  role?: string | Array<string>
}
查询方法
该方法适用于大多数会返回响应的语句,例如 SELECT,也可用于发送 DDL 语句 (如 CREATE TABLE) ,并且应使用 await 等待其完成。返回的结果集应在应用程序中进行处理。
interface QueryParams extends BaseQueryParams {
  // Query to execute that might return some data.
  query: string
  // Format of the resulting dataset. Default: JSON.
  format?: DataFormat
}

interface ClickHouseClient {
  query(params: QueryParams): Promise<ResultSet>
}另请参见:Base parameters for all client methods。
结果集和行抽象
ResultSet 提供了多种便捷方法,便于在应用程序中处理数据。
Node.js 中的 ResultSet 实现底层使用 Stream.Readable,而 Web 版本使用 Web API ReadableStream。
你可以在 ResultSet 上调用 text 或 json 方法来消费 ResultSet,并将查询返回的全部行加载到内存中。
你应尽早开始消费 ResultSet,因为它会保持响应流处于打开状态,从而使底层连接始终处于忙碌状态。客户端不会缓冲传入的数据,以避免应用程序出现过高的内存占用。
或者,如果数据量太大,无法一次全部装入内存,你可以调用 stream 方法,以流式模式处理数据。这样,响应中的每个 chunk 都会被转换为一个相对较小的行数组 (该数组的大小取决于客户端从服务端接收到的特定 chunk 的大小——这可能会变化——以及单行的大小) ,并逐个 chunk 进行处理。
请参阅支持的数据格式列表,以确定哪种格式最适合你的流式场景。例如,如果你想流式传输 JSON 对象,可以选择 JSONEachRow,这样每一行都会被解析为一个 JS 对象;或者,也可以选择更紧凑的 JSONCompactColumns 格式,这样每一行都会成为一个紧凑的值数组。另请参见:streaming files。
interface BaseResultSet<Stream> {
  // See "Query ID" section above
  query_id: string

  // Consume the entire stream and get the contents as a string
  // Can be used with any DataFormat
  // Should be called only once
  text(): Promise<string>

  // Consume the entire stream and parse the contents as a JS object
  // Can be used only with JSON formats
  // Should be called only once
  json<T>(): Promise<T>

  // Returns a readable stream for responses that can be streamed
  // Every iteration over the stream provides an array of Row[] in the selected DataFormat
  // Should be called only once
  stream(): Stream
}

interface Row {
  // Get the content of the row as a plain string
  text: string

  // Parse the content of the row as a JS object
  json<T>(): T
}
示例: (Node.js/Web) 一个查询示例:结果数据集采用 JSONEachRow 格式,读取整个流,并将内容解析为 JS 对象。
源代码。
const resultSet = await client.query({
  query: 'SELECT * FROM my_table',
  format: 'JSONEachRow',
})
const dataset = await resultSet.json() // or `row.text` to avoid parsing JSON
示例: (仅适用于 Node.js) 使用经典的 on('data') 方式,以 JSONEachRow 格式流式处理查询结果。这种方式可与 for await const 语法互换使用。源代码。
const rows = await client.query({
  query: 'SELECT number FROM system.numbers_mt LIMIT 5',
  format: 'JSONEachRow', // or JSONCompactEachRow, JSONStringsEachRow, etc.
})
const stream = rows.stream()
stream.on('data', (rows: Row[]) => {
  rows.forEach((row: Row) => {
    console.log(row.json()) // or `row.text` to avoid parsing JSON
  })
})
await new Promise((resolve, reject) => {
  stream.on('end', () => {
    console.log('Completed!')
    resolve(0)
  })
  stream.on('error', reject)
})
示例: (仅限 Node.js) 使用经典的 on('data') 方式,以 CSV 格式流式处理查询结果。这与 for await const 语法可以互换使用。
源代码
const resultSet = await client.query({
  query: 'SELECT number FROM system.numbers_mt LIMIT 5',
  format: 'CSV', // or TabSeparated, CustomSeparated, etc.
})
const stream = resultSet.stream()
stream.on('data', (rows: Row[]) => {
  rows.forEach((row: Row) => {
    console.log(row.text)
  })
})
await new Promise((resolve, reject) => {
  stream.on('end', () => {
    console.log('Completed!')
    resolve(0)
  })
  stream.on('error', reject)
})
示例: (仅限 Node.js) 使用 for await const 语法,以 JSONEachRow 格式将流式查询结果作为 JS 对象进行消费。这可与经典的 on('data') 方式互换使用。
源代码.
const resultSet = await client.query({
  query: 'SELECT number FROM system.numbers LIMIT 10',
  format: 'JSONEachRow', // or JSONCompactEachRow, JSONStringsEachRow, etc.
})
for await (const rows of resultSet.stream()) {
  rows.forEach(row => {
    console.log(row.json())
  })
}示例: (仅限 Web) 遍历对象 ReadableStream。
const resultSet = await client.query({
  query: 'SELECT * FROM system.numbers LIMIT 10',
  format: 'JSONEachRow'
})

const reader = resultSet.stream().getReader()
while (true) {
  const { done, value: rows } = await reader.read()
  if (done) { break }
  rows.forEach(row => {
    console.log(row.json())
  })
}
Insert 方法
这是执行数据插入的主要方法。
export interface InsertResult {
  query_id: string
  executed: boolean
}

interface ClickHouseClient {
  insert(params: InsertParams): Promise<InsertResult>
}
返回类型非常精简,因为我们不预期服务器会返回任何数据,并且会立即耗尽响应流。
如果向 insert 方法传入的是空数组,则 insert 语句不会发送到服务器;相反,该方法会立即返回 { query_id: '...', executed: false }。在这种情况下,如果没有在方法参数 params 中提供 query_id,那么结果中的它将是空字符串,因为返回由客户端生成的随机 UUID 可能会造成混淆——毕竟,带有该 query_id 的查询并不存在于 system.query_log 表中。
如果 insert 语句已发送到服务器,则 executed 将为 true。
Node.js 中的 Insert 方法 与流式传输
根据为 insert 方法指定的数据格式,它既可以接受 Stream.Readable,也可以接受普通的 Array<T>。另请参阅关于文件流式传输的这一节。
通常应使用 await 等待 Insert 方法;不过,也可以先指定一个输入流,等到流完成后再等待 insert 操作 (这也会使 insert promise resolve) 。这在事件监听器及类似场景中可能很有用,但错误处理并不简单,而且客户端会有很多边界情况需要处理。作为替代方案,建议考虑使用异步插入,如此示例所示。
interface InsertParams<T> extends BaseQueryParams {
  // Table name to insert the data into
  table: string
  // A dataset to insert.
  values: ReadonlyArray<T> | Stream.Readable
  // Format of the dataset to insert.
  format?: DataFormat
  // Allows to specify which columns the data will be inserted into.
  // - An array such as `['a', 'b']` will generate: `INSERT INTO table (a, b) FORMAT DataFormat`
  // - An object such as `{ except: ['a', 'b'] }` will generate: `INSERT INTO table (* EXCEPT (a, b)) FORMAT DataFormat`
  // By default, the data is inserted into all columns of the table,
  // and the generated statement will be: `INSERT INTO table FORMAT DataFormat`.
  columns?: NonEmptyArray<string> | { except: NonEmptyArray<string> }
}另请参见:Base parameters for all client methods。
示例: (Node.js/Web) 插入值数组。 源代码。
await client.insert({
  table: 'my_table',
  // structure should match the desired format, JSONEachRow in this example
  values: [
    { id: 42, name: 'foo' },
    { id: 42, name: 'bar' },
  ],
  format: 'JSONEachRow',
})
示例: (仅限 Node.js) 从 CSV 文件中以流方式插入数据。 源代码。另请参阅:文件流式传输。
await client.insert({
  table: 'my_table',
  values: fs.createReadStream('./path/to/a/file.csv'),
  format: 'CSV',
})示例:从 INSERT 语句中排除某些列。
假设有如下表定义:
CREATE OR REPLACE TABLE mytable
(id UInt32, message String)
ENGINE MergeTree()
ORDER BY (id)
仅插入指定列:
// Generated statement: INSERT INTO mytable (message) FORMAT JSONEachRow
await client.insert({
  table: 'mytable',
  values: [{ message: 'foo' }],
  format: 'JSONEachRow',
  // `id` column value for this row will be zero (default for UInt32)
  columns: ['message'],
})
排除某些列:
// Generated statement: INSERT INTO mytable (* EXCEPT (message)) FORMAT JSONEachRow
await client.insert({
  table: tableName,
  values: [{ id: 144 }],
  format: 'JSONEachRow',
  // `message` column value for this row will be an empty string
  columns: {
    except: ['message'],
  },
})更多详细信息,请参见源代码。
示例:插入到与提供给 client 实例的数据库不同的数据库中。源代码。
await client.insert({
  table: 'mydb.mytable', // Fully qualified name including the database
  values: [{ id: 42, message: 'foo' }],
  format: 'JSONEachRow',
})
Web 版本限制
目前,@clickhouse/client-web 中的插入操作仅支持 Array<T> 和 JSON* 格式。
由于浏览器兼容性欠佳,Web 版本目前尚不支持流式插入。
因此,Web 版本的 InsertParams 接口与 Node.js 版本略有不同,
因为 values 仅限使用 ReadonlyArray<T> 类型:
interface InsertParams<T> extends BaseQueryParams {
  // Table name to insert the data into
  table: string
  // A dataset to insert.
  values: ReadonlyArray<T>
  // Format of the dataset to insert.
  format?: DataFormat
  // Allows to specify which columns the data will be inserted into.
  // - An array such as `['a', 'b']` will generate: `INSERT INTO table (a, b) FORMAT DataFormat`
  // - An object such as `{ except: ['a', 'b'] }` will generate: `INSERT INTO table (* EXCEPT (a, b)) FORMAT DataFormat`
  // By default, the data is inserted into all columns of the table,
  // and the generated statement will be: `INSERT INTO table FORMAT DataFormat`.
  columns?: NonEmptyArray<string> | { except: NonEmptyArray<string> }
}此内容今后可能会有所变动。另请参见:Base parameters for all client methods。
命令方法
它可用于无任何输出的语句、FORMAT 子句不适用的情况,或者你根本不关心响应内容的情况。这类语句的一个示例是 CREATE TABLE 或 ALTER TABLE。
应使用 await 等待。
响应流会立即销毁,这意味着底层套接字会被释放。
interface CommandParams extends BaseQueryParams {
  // Statement to execute.
  query: string
}

interface CommandResult {
  query_id: string
}

interface ClickHouseClient {
  command(params: CommandParams): Promise<CommandResult>
}另见:Base parameters for all client methods。
示例: (Node.js/Web) 在 ClickHouse Cloud 中创建表。 源代码。
await client.command({
  query: `
    CREATE TABLE IF NOT EXISTS my_cloud_table
    (id UInt64, name String)
    ORDER BY (id)
  `,
  // Recommended for cluster usage to avoid situations where a query processing error occurred after the response code,
  // and HTTP headers were already sent to the client.
  // See https://clickhouse.com/docs/interfaces/http/#response-buffering
  clickhouse_settings: {
    wait_end_of_query: 1,
  },
})
示例: (Node.js/Web) 在自托管的 ClickHouse 实例中创建表。 源代码.
await client.command({
  query: `
    CREATE TABLE IF NOT EXISTS my_table
    (id UInt64, name String)
    ENGINE MergeTree()
    ORDER BY (id)
  `,
})
示例: (Node.js/Web) INSERT FROM SELECT
await client.command({
  query: `INSERT INTO my_table SELECT '42'`,
})Exec 方法
如果你有不适合使用 query/insert 的自定义查询,
并且需要获取返回结果,可以使用 exec 来替代 command。
exec 会返回一个可读流,必须在应用程序端消费或销毁。
interface ExecParams extends BaseQueryParams {
  // Statement to execute.
  query: string
}

interface ClickHouseClient {
  exec(params: ExecParams): Promise<QueryResult>
}另请参见:Base parameters for all client methods。
在 Node.js 版本和 Web 版本中,stream 的返回类型不同。
Node.js:
export interface QueryResult {
  stream: Stream.Readable
  query_id: string
}
网页:
export interface QueryResult {
  stream: ReadableStream
  query_id: string
}
Ping
用于检查连接状态的 ping 方法会在服务器可达时返回 true。
如果服务器不可达,结果中也会包含底层错误。
type PingResult =
  | { success: true }
  | { success: false; error: Error }

/** Parameters for the health-check request - using the built-in `/ping` endpoint.
 *  This is the default behavior for the Node.js version. */
export type PingParamsWithEndpoint = {
  select: false
  /** AbortSignal instance to cancel a request in progress. */
  abort_signal?: AbortSignal
  /** Additional HTTP headers to attach to this particular request. */
  http_headers?: Record<string, string>
}
/** Parameters for the health-check request - using a SELECT query.
 *  This is the default behavior for the Web version, as the `/ping` endpoint does not support CORS.
 *  Most of the standard `query` method params, e.g., `query_id`, `abort_signal`, `http_headers`, etc. will work,
 *  except for `query_params`, which does not make sense to allow in this method. */
export type PingParamsWithSelectQuery = { select: true } & Omit<
  BaseQueryParams,
  'query_params'
>
export type PingParams = PingParamsWithEndpoint | PingParamsWithSelectQuery

interface ClickHouseClient {
  ping(params?: PingParams): Promise<PingResult>
}
Ping 可作为应用启动时检查服务器是否可用的实用方法,尤其是在 ClickHouse Cloud 中,实例可能处于空闲状态,并会在收到 ping 后唤醒:在这种情况下,你可能需要在每次重试之间加上延迟,并重试几次。
请注意,默认情况下,Node.js 版本使用 /ping 端点,而 Web 版本则使用简单的 SELECT 1 查询来达到类似效果,因为 /ping 端点不支持 CORS。
示例: (Node.js/Web) 对 ClickHouse 服务器实例执行一次简单的 ping。注意:对于 Web 版本,捕获到的错误会有所不同。 源代码。
const result = await client.ping();
if (!result.success) {
  // process result.error
}
**示例:**如果你还想在调用 ping 方法时一并检查凭据,或指定额外参数 (如 query_id) ,可以按如下方式使用:
const result = await client.ping({ select: true, /* query_id, abort_signal, http_headers, or any other query params */ });ping 方法允许使用大多数标准 query 方法参数——请参见 PingParamsWithSelectQuery 类型定义。
Close (仅限 Node.js)
关闭所有已打开的连接并释放资源。在 Web 版本中为空操作。
await client.close()文件流式传输 (仅限 Node.js)
客户端代码仓库中提供了多个使用常见数据格式 (NDJSON、CSV、Parquet) 的文件流式传输示例。
将其他格式流式传输到文件的方法应与 Parquet 类似,
唯一的区别在于 query 调用中使用的格式 (JSONEachRow、CSV 等) 以及输出文件名。
支持的数据格式
客户端可按 JSON 或文本格式处理数据。
如果你将 format 指定为 JSON 格式家族中的某一种 (JSONEachRow、JSONCompactEachRow 等) ,客户端会在传输过程中对数据进行序列化和反序列化。
以“原始”文本格式 (CSV、TabSeparated 和 CustomSeparated 家族) 提供的数据会在传输过程中直接发送,不做额外转换。
| Format | Input (数组) | Input (对象) | Input/Output (Stream) | Output (JSON) | Output (文本) |
|---|---|---|---|---|---|
| JSON | ❌ | ✔️ | ❌ | ✔️ | ✔️ |
| JSONCompact | ❌ | ✔️ | ❌ | ✔️ | ✔️ |
| JSONObjectEachRow | ❌ | ✔️ | ❌ | ✔️ | ✔️ |
| JSONColumnsWithMetadata | ❌ | ✔️ | ❌ | ✔️ | ✔️ |
| JSONStrings | ❌ | ❌️ | ❌ | ✔️ | ✔️ |
| JSONCompactStrings | ❌ | ❌ | ❌ | ✔️ | ✔️ |
| JSONEachRow | ✔️ | ❌ | ✔️ | ✔️ | ✔️ |
| JSONEachRowWithProgress | ❌️ | ❌ | ✔️ ❗- 见下文 | ✔️ | ✔️ |
| JSONStringsEachRow | ✔️ | ❌ | ✔️ | ✔️ | ✔️ |
| JSONCompactEachRow | ✔️ | ❌ | ✔️ | ✔️ | ✔️ |
| JSONCompactStringsEachRow | ✔️ | ❌ | ✔️ | ✔️ | ✔️ |
| JSONCompactEachRowWithNames | ✔️ | ❌ | ✔️ | ✔️ | ✔️ |
| JSONCompactEachRowWithNamesAndTypes | ✔️ | ❌ | ✔️ | ✔️ | ✔️ |
| JSONCompactStringsEachRowWithNames | ✔️ | ❌ | ✔️ | ✔️ | ✔️ |
| JSONCompactStringsEachRowWithNamesAndTypes | ✔️ | ❌ | ✔️ | ✔️ | ✔️ |
| CSV | ❌ | ❌ | ✔️ | ❌ | ✔️ |
| CSVWithNames | ❌ | ❌ | ✔️ | ❌ | ✔️ |
| CSVWithNamesAndTypes | ❌ | ❌ | ✔️ | ❌ | ✔️ |
| TabSeparated | ❌ | ❌ | ✔️ | ❌ | ✔️ |
| TabSeparatedRaw | ❌ | ❌ | ✔️ | ❌ | ✔️ |
| TabSeparatedWithNames | ❌ | ❌ | ✔️ | ❌ | ✔️ |
| TabSeparatedWithNamesAndTypes | ❌ | ❌ | ✔️ | ❌ | ✔️ |
| CustomSeparated | ❌ | ❌ | ✔️ | ❌ | ✔️ |
| CustomSeparatedWithNames | ❌ | ❌ | ✔️ | ❌ | ✔️ |
| CustomSeparatedWithNamesAndTypes | ❌ | ❌ | ✔️ | ❌ | ✔️ |
| Parquet | ❌ | ❌ | ✔️ | ❌ | ✔️❗- 见下文 |
对于 Parquet,selects 的主要用例很可能是将结果流写入文件。请参见客户端代码仓库中的示例。
JSONEachRowWithProgress 是一种仅用于输出的格式,支持在流中报告进度。更多详情请参见此示例。
ClickHouse 完整的输入和输出格式列表可在 此处查看。
支持的 ClickHouse 数据类型
| 类型 | 状态 | JS 类型 |
|---|---|---|
| UInt8/16/32 | ✔️ | number |
| UInt64/128/256 | ✔️ ❗- 见下文 | string |
| Int8/16/32 | ✔️ | number |
| Int64/128/256 | ✔️ ❗- 见下文 | string |
| Float32/64 | ✔️ | number |
| Decimal | ✔️ ❗- 见下文 | number |
| 布尔值 | ✔️ | boolean |
| String | ✔️ | string |
| FixedString | ✔️ | string |
| UUID | ✔️ | string |
| Date32/64 | ✔️ | string |
| DateTime32/64 | ✔️ ❗- 见下文 | string |
| 枚举 | ✔️ | string |
| LowCardinality | ✔️ | string |
| Array(T) | ✔️ | T[] |
| (new) JSON | ✔️ | object |
| Variant(T1, T2…) | ✔️ | T (取决于具体变体) |
| Dynamic | ✔️ | T (取决于具体变体) |
| Nested | ✔️ | T[] |
| Tuple(T1, T2, …) | ✔️ | [T1, T2, …] |
| Tuple(n1 T1, n2 T2…) | ✔️ | { n1: T1; n2: T2; …} |
| Nullable(T) | ✔️ | T 对应的 JS 类型或 null |
| IPv4 | ✔️ | string |
| IPv6 | ✔️ | string |
| Point | ✔️ | [ number, number ] |
| Ring | ✔️ | Array<Point> |
| Polygon | ✔️ | Array<Ring> |
| MultiPolygon | ✔️ | Array<Polygon> |
| Map(K, V) | ✔️ | Record<K, V> |
| Time/Time64 | ✔️ | string |
完整的受支持 ClickHouse 格式列表可在 此处查看。
另请参阅:
Date/Date32 类型注意事项
由于客户端在插入值时不会进行额外的类型转换,因此 Date/Date32 类型的列只能以
字符串形式插入。
示例: 插入一个 Date 类型的值。
源代码
await client.insert({
  table: 'my_table',
  values: [ { date: '2022-09-05' } ],
  format: 'JSONEachRow',
})
不过,如果你使用的是 DateTime 或 DateTime64 列,也可以同时使用字符串和 JS Date 对象。将 date_time_input_format 设为 best_effort 时,JS Date 对象可直接按原样传递给 insert。更多详情请参见此示例。
Decimal* 类型注意事项
可以使用 JSON* 家族格式插入 Decimal 类型。假设我们定义了如下表:
CREATE TABLE my_table
(
  id     UInt32,
  dec32  Decimal(9, 2),
  dec64  Decimal(18, 3),
  dec128 Decimal(38, 10),
  dec256 Decimal(76, 20)
)
ENGINE MergeTree()
ORDER BY (id)
我们可以使用字符串表示形式插入值,以避免精度损失:
await client.insert({
  table: 'my_table',
  values: [{
    id: 1,
    dec32:  '1234567.89',
    dec64:  '123456789123456.789',
    dec128: '1234567891234567891234567891.1234567891',
    dec256: '12345678912345678912345678911234567891234567891234567891.12345678911234567891',
  }],
  format: 'JSONEachRow',
})
但是,在以 JSON* 格式查询数据时,ClickHouse 默认会将 Decimal 以数值形式返回,这可能会导致精度丢失。为避免这种情况,可以在查询中将 Decimal 转换为 String:
await client.query({
  query: `
    SELECT toString(dec32)  AS decimal32,
           toString(dec64)  AS decimal64,
           toString(dec128) AS decimal128,
           toString(dec256) AS decimal256
    FROM my_table
  `,
  format: 'JSONEachRow',
})更多详情请参见此示例。
整数类型:Int64、Int128、Int256、UInt64、UInt128、UInt256
虽然 server 可以将其作为数值接收,但在 JSON* 家族的输出格式中,为避免整数溢出,它会以字符串形式返回,
因为这些类型的最大值大于 Number.MAX_SAFE_INTEGER。
不过,可以通过
output_format_json_quote_64bit_integers 设置
修改这一行为。
**示例:**调整 64 位数值的 JSON 输出格式。
const resultSet = await client.query({
  query: 'SELECT * from system.numbers LIMIT 1',
  format: 'JSONEachRow',
})

expect(await resultSet.json()).toEqual([ { number: '0' } ])
const resultSet = await client.query({
query: 'SELECT * from system.numbers LIMIT 1',
format: 'JSONEachRow',
clickhouse_settings: { output_format_json_quote_64bit_integers: 0 },
})
expect(await resultSet.json()).toEqual([ { number: 0 } ])ClickHouse 设置
客户端可以通过 设置 机制来调整 ClickHouse 的行为。 这些设置可以在客户端实例级别进行配置,从而应用于发送到 ClickHouse 的每个请求:
const client = createClient({
  clickhouse_settings: {}
})
或者,也可以在请求级别配置某项设置:
client.query({
  clickhouse_settings: {}
})
包含所有受支持的 ClickHouse 设置 的类型声明文件可在 此处查看。
进阶主题
带参数的查询
您可以创建带参数的查询,并从客户端应用程序传入参数值。这样可以避免在客户端侧 使用特定的动态值拼接查询。
像往常一样编写查询,然后将希望从应用程序参数传递给查询的值放在花括号中,格式 如下:
{<name>: <data_type>}其中:
name— 占位标识符。data_type- 应用参数值的数据类型。
示例: 带参数的查询。 源代码 。
await client.query({
  query: 'SELECT plus({val1: Int32}, {val2: Int32})',
  format: 'CSV',
  query_params: {
    val1: 10,
    val2: 20,
  },
})
更多详情,请参阅 https://clickhouse.com/docs/interfaces/client#cli-queries-with-parameters-syntax。
压缩
注意:Web 版本目前不支持请求压缩。响应压缩可正常工作。Node.js 版本两者都支持。
对于通过网络传输大型数据集的数据应用,启用压缩会带来明显收益。目前仅支持通过 zlib 使用 GZIP。
createClient({
  compression: {
    response: true,
    request: true
  }
})
配置参数如下:
response: true表示 ClickHouse 服务器会返回压缩后的响应体。默认值:response: falserequest: true启用客户端请求体压缩。默认值:request: false
日志 (仅限 Node.js)
默认的日志记录器实现会通过 console.debug/info 方法将日志记录输出到 stdout,并通过 console.warn/error 方法输出到 stderr。
你可以通过提供 LoggerClass 来自定义日志逻辑,并通过 level 参数选择所需的日志级别 (默认为 WARN) :
import type { Logger } from '@clickhouse/client'

// All three LogParams types are exported by the client
interface LogParams {
  module: string
  message: string
  args?: Record<string, unknown>
}
type ErrorLogParams = LogParams & { err: Error }
type WarnLogParams = LogParams & { err?: Error }

class MyLogger implements Logger {
  trace({ module, message, args }: LogParams) {
    // ...
  }
  debug({ module, message, args }: LogParams) {
    // ...
  }
  info({ module, message, args }: LogParams) {
    // ...
  }
  warn({ module, message, args }: WarnLogParams) {
    // ...
  }
  error({ module, message, args, err }: ErrorLogParams) {
    // ...
  }
}

const client = createClient({
  log: {
    LoggerClass: MyLogger,
    level: ClickHouseLogLevel.DEBUG,
  }
})
当前,客户端会记录以下事件:
TRACE- 有关 Keep-Alive 套接字生命周期的底层信息DEBUG- 响应信息 (不包含授权请求头和主机信息)INFO- 基本不用,会在客户端初始化时输出当前日志级别WARN- 非致命错误;失败的ping请求会记录为 warning,因为底层错误已包含在返回结果中ERROR-query/insert/exec/command方法中的致命错误,例如请求失败
你可以在这里找到默认的日志记录器实现。
TLS 证书 (仅限 Node.js)
Node.js 客户端可选择支持基本 TLS (仅 CA) 和双向 TLS (CA 和客户端证书) 。
基本 TLS 配置示例,假设你的证书位于 certs 文件夹中,
且 CA 文件名为 CA.pem:
const client = createClient({
  url: 'https://<hostname>:<port>',
  username: '<username>',
  password: '<password>', // if required
  tls: {
    ca_cert: fs.readFileSync('certs/CA.pem'),
  },
})
使用客户端证书的双向 TLS 配置示例:
const client = createClient({
  url: 'https://<hostname>:<port>',
  username: '<username>',
  tls: {
    ca_cert: fs.readFileSync('certs/CA.pem'),
    cert: fs.readFileSync(`certs/client.crt`),
    key: fs.readFileSync(`certs/client.key`),
  },
})Keep-alive 配置 (仅限 Node.js)
默认情况下,客户端会在底层 HTTP agent 中启用 Keep-Alive,这意味着已建立连接的套接字会复用于后续请求,并发送 Connection: keep-alive 请求头。默认情况下,空闲套接字会在连接池中保留 2500 毫秒 (请参阅关于如何调整此选项的说明) 。
keep_alive.idle_socket_ttl 的值应明显低于服务器/LB 的配置。主要原因是,HTTP/1.1 允许服务器在不通知客户端的情况下关闭套接字;如果服务器或负载均衡器先于客户端关闭连接,客户端可能会尝试复用这个已关闭的套接字,从而导致 socket hang up 错误。
如果你要修改 keep_alive.idle_socket_ttl,请记住,它应始终与服务器/LB 的 Keep-Alive 配置相匹配,并且必须始终更低,以确保服务器不会先关闭仍处于打开状态的连接。
调整 idle_socket_ttl
客户端将 keep_alive.idle_socket_ttl 设置为 2500 毫秒,因为这通常可以视为最稳妥的默认值;服务端的 keep_alive_timeout 在23.11 之前的 ClickHouse 版本中甚至可能低至 3 秒,且无需修改 config.xml。
你可以运行以下命令,从服务端响应请求头中找到正确的 Keep-Alive 超时值:
curl -is --data-binary "SELECT 1" <clickhouse_url>查看响应中 Connection 和 Keep-Alive 请求头的值。例如:
Connection: Keep-Alive
Keep-Alive: timeout=10在这种情况下,keep_alive_timeout 为 10 秒,你可以尝试将 keep_alive.idle_socket_ttl 提高到 9000 甚至 9500 毫秒,让空闲套接字保持打开状态的时间比默认情况下稍长一些。请留意可能出现的 "Socket hang-up" 错误,这表明服务端会先于客户端关闭连接;请逐步调低该值,直到错误消失。
故障排查
如果你在使用最新版 client 时仍然遇到 socket hang up 错误,可以通过以下几种方式解决:
-
启用至少为
WARN的日志级别 (默认值) 。这样可以检查应用程序代码中是否存在未消费或悬空的流:传输层会以 WARN 级别记录这类情况,因为它们可能导致套接字被 server 关闭。你可以按如下方式在 client 配置中启用日志:const client = createClient({ log: { level: ClickHouseLogLevel.WARN }, }) -
确保所需配置已应用到正确的 client instance。如果你的应用中有多个 client instance,请再次确认你实际用于 queries 的那个实例设置了正确的
keep_alive.idle_socket_ttl值。 -
在 client 配置中将
keep_alive.idle_socket_ttl调小 500 毫秒。在某些情况下,例如 client 与 server 之间网络延迟较高时,这样做可能会有帮助,可以排除这样一种情况:发出的 request 恰好拿到了一个即将被 server 关闭的套接字。 -
如果此错误发生在长时间运行且没有数据进出 (例如长时间运行的
INSERT FROM SELECT) 的 queries 期间,原因可能是 load balancer 或其他网络组件关闭了长连接或长时间运行的 requests。你可以尝试组合使用以下 ClickHouse 设置,在长时间运行的 queries 期间强制产生一些传入数据:const client = createClient({ // 这里我们假设某些 query 的执行时间会超过 5 分钟 request_timeout: 400_000, /** 这些 settings 组合使用时,可以避免长时间运行且没有数据进出的 query 出现 LB timeout 问题, * 例如 `INSERT FROM SELECT` 及类似 query,因为连接可能会被 LB 标记为空闲并被突然关闭。 * 在这里,我们假设 LB 的空闲连接 timeout 为 120s,因此将 110s 设置为一个“安全”值。 */ clickhouse_settings: { send_progress_in_http_headers: 1, http_headers_progress_interval_ms: '110000', // UInt64,应作为字符串传递 }, })不过请注意,在较新的 Node.js 版本中,接收到的请求头总大小限制为 16KB;在接收到一定数量的进度请求头后 (根据我们的测试,大约是 70-80 个) ,会抛出异常。
也可以采用一种完全不同的方法,彻底避免线上传输中的等待时间;这可以利用 HTTP interface 的一个“特性”:连接丢失时,变更 不会被取消。更多详情请参见这个示例 (第 2 部分) 。
-
也可以完全禁用 Keep-Alive 功能。在这种情况下,client 还会为每个 request 添加
Connection: close请求头,底层 HTTP agent 也不会复用连接。keep_alive.idle_socket_ttl设置将被忽略,因为不会有空闲套接字。这会带来额外开销,因为每个 request 都需要建立一个新连接。const client = createClient({ keep_alive: { enabled: false, }, }) -
可以运行一个简单的命令行测试,排除网络技术栈其他部分 (包括 Node.js 本身) 的潜在问题。测试时使用同一个 ClickHouse instance 和相同的网络路径 (即同一台机器或同一网段,例如某个 Kubernetes pod) ,例如使用
curl:curl -is --user '<user>:<password>' --data-binary "SELECT 1" <clickhouse_url>你可能需要将其循环运行几分钟。如果你在
curl中也看到类似错误,那么问题很可能与 client 配置无关,而是出在网络技术栈或 server configuration 上。 -
如果要使用原生 Node.js 功能测试连接,你可以尝试使用内置的
fetchAPI 向 ClickHouse server 发起一个简单的 HTTP request:
  const response = await fetch('<clickhouse_url>?query=SELECT+1', {
    method: 'POST',
    headers: {
      'Authorization': 'Basic ' + Buffer.from('<user>:<password>').toString('base64'),
    }
})-
在某些情况下,应用程序代码或框架适配器可能会在实际执行查询前先发起一次
ping()。这可能会导致这样一种情况:ping()请求成功,但紧随其后的查询请求却因空闲连接的同一底层问题而失败,并报出 “socket hang up” 错误。如果你在日志中看到这种模式,请检查你的框架或应用程序代码中是否提供了禁用预先ping()的选项。这也有助于降低被中间网络组件限流的概率。 -
确保应用程序本身获得了足够的 CPU 时间,并且网络未被托管提供商限流。各种监控手段 (如 GC 暂停指标、事件循环延迟指标等) 也有助于排查潜在的资源饥饿问题。
-
尝试在启用 no-floating-promises ESLint 规则的情况下检查应用程序代码,这有助于识别未处理的 Promise,因为它们可能导致悬空的流和套接字。
只读用户
使用带有 readonly=1 用户 的客户端时,无法启用响应压缩,因为这需要 enable_http_compression 设置。以下配置会导致错误:
const client = createClient({
  compression: {
    response: true, // won't work with a readonly=1 user
  },
})请参阅示例,其中更详细地展示了 readonly=1 用户的限制。
带路径名的代理
如果您的 ClickHouse 实例位于代理后面,且其 URL 中包含路径名,例如 http://proxy:8123/clickhouse_server,请将 clickhouse_server 指定为 pathname 配置选项 (可以带前导斜杠,也可以不带) ;否则,如果直接在 url 中提供,它会被视为 database 选项。支持多段路径,例如 /my_proxy/db。
const client = createClient({
  url: 'http://proxy:8123',
  pathname: '/clickhouse_server',
})
使用身份验证的反向代理
如果您在 ClickHouse 部署前配置了启用身份验证的反向代理,可以使用 http_headers 设置在其中提供所需的请求头:
const client = createClient({
  http_headers: {
    'My-Auth-Header': '...',
  },
})
自定义 HTTP/HTTPS agent (Experimental,仅限 Node.js)
默认情况下,客户端会使用客户端配置中提供的设置 (例如 max_open_connections、keep_alive.enabled、tls) 来配置底层 HTTP 或 HTTPS agent,并由其处理与 ClickHouse server 的连接。此外,如果使用了 TLS 证书,底层 agent 还会配置所需的证书,并强制使用正确的 TLS 认证请求头。
从 1.2.0 版本开始,可以为客户端提供自定义 HTTP 或 HTTPS agent,以替换默认的底层 agent。这在网络配置较为复杂时可能会很有用。如果提供了自定义 agent,则适用以下条件:
max_open_connections和tls选项将_不起作用_,并会被客户端忽略,因为它们属于底层 agent 配置的一部分。keep_alive.enabled只会控制Connection请求头的默认值 (true->Connection: keep-alive,false->Connection: close) 。- 虽然空闲 keep-alive 套接字管理仍然会继续生效 (因为它不依赖于 agent,而是依赖于具体的套接字本身) ,但现在可以通过将
keep_alive.idle_socket_ttl的值设置为0来完全禁用它。
自定义代理的用法示例
在不使用证书的情况下使用自定义 HTTP 或 HTTPS Agent:
const agent = new http.Agent({ // or https.Agent
  keepAlive: true,
  keepAliveMsecs: 2500,
  maxSockets: 10,
  maxFreeSockets: 10,
})
const client = createClient({
  http_agent: agent,
})
使用自定义 HTTPS Agent,配合基础 TLS 和 CA 证书:
const agent = new https.Agent({
  keepAlive: true,
  keepAliveMsecs: 2500,
  maxSockets: 10,
  maxFreeSockets: 10,
  ca: fs.readFileSync('./ca.crt'),
})
const client = createClient({
  url: 'https://myserver:8443',
  http_agent: agent,
  // With a custom HTTPS agent, the client won't use the default HTTPS connection implementation; the headers should be provided manually
  http_headers: {
    'X-ClickHouse-User': 'username',
    'X-ClickHouse-Key': 'password',
  },
  // Important: authorization header conflicts with the TLS headers; disable it.
  set_basic_auth_header: false,
})
在自定义 HTTPS Agent 中使用 mutual TLS:
const agent = new https.Agent({
  keepAlive: true,
  keepAliveMsecs: 2500,
  maxSockets: 10,
  maxFreeSockets: 10,
  ca: fs.readFileSync('./ca.crt'),
  cert: fs.readFileSync('./client.crt'),
  key: fs.readFileSync('./client.key'),
})
const client = createClient({
  url: 'https://myserver:8443',
  http_agent: agent,
  // With a custom HTTPS agent, the client won't use the default HTTPS connection implementation; the headers should be provided manually
  http_headers: {
    'X-ClickHouse-User': 'username',
    'X-ClickHouse-Key': 'password',
    'X-ClickHouse-SSL-Certificate-Auth': 'on',
  },
  // Important: authorization header conflicts with the TLS headers; disable it.
  set_basic_auth_header: false,
})
使用证书 并 配合自定义 HTTPS Agent 时,很可能需要通过 set_basic_auth_header 设置禁用默认的授权请求头 (于 1.2.0 引入) ,因为它会与 TLS 请求头发生冲突。所有 TLS 请求头都应手动提供。
已知限制 (Node.js/web)
- 结果集暂无数据映射器,因此仅使用语言的基本类型。计划在支持 RowBinary format 后引入部分数据类型映射器。
- 某些 Decimal* 和 Date* / DateTime* 数据类型有一些注意事项。
- 使用 JSON* 家族格式时,大于 Int32 的数字会以字符串表示,因为 Int64+ 类型的最大值超过了
Number.MAX_SAFE_INTEGER。更多详情请参见 整数类型 部分。
已知限制 (Web)
select查询支持流式处理,但对插入操作不支持 (在类型层面也是如此) 。- 请求压缩已禁用,相关配置会被忽略。响应压缩可正常工作。
- 暂不支持日志。
性能优化提示
- 为减少应用程序的内存占用,在适用的情况下,可考虑对大型插入 (例如从文件进行插入) 以及 select 查询使用流。对于事件监听器和类似用例,异步插入 也是一个不错的选择,它可以尽量减少,甚至完全避免在客户端进行批处理。异步插入示例可在客户端代码仓库中找到,文件名前缀为
async_insert_。 - 该 client 默认不启用请求或响应压缩。不过,在查询或插入大型数据集时,你可以考虑通过
ClickHouseClientConfigOptions.compression启用压缩 (仅针对request或response,或同时启用两者) 。 - 压缩会带来明显的性能开销。对
request或response启用压缩,分别会降低插入或查询的速度,但会减少应用程序传输的网络流量。
联系我们
如果你有任何问题或需要帮助,欢迎通过 Community Slack (#clickhouse-js 频道) 或在 GitHub issues 中联系我们。