

 Set up docs MCP
Query API endpoint 기능을 사용하면 ClickHouse Cloud 콘솔에 저장된 모든 SQL 쿼리로부터 API 엔드포인트를 직접 생성할 수 있습니다. 네이티브 드라이버로 ClickHouse Cloud 서비스에 연결하지 않아도 HTTP를 통해 API 엔드포인트에 액세스하여 저장된 쿼리를 실행할 수 있습니다.
사전 요구 사항
계속하기 전에 다음 항목이 준비되어 있는지 확인하십시오:
- 적절한 권한이 부여된 API Key
- 관리자 Console 역할
아직 없다면 이 가이드를 따라 API Key를 생성할 수 있습니다.
저장된 쿼리 만들기
이미 저장된 쿼리가 있으면 이 단계는 건너뛰어도 됩니다.
Open a new query tab. For demonstration purposes, we'll use the youtube dataset, which contains approximately 4.5 billion records. Follow the steps in section "Create table" to create the table on your Cloud service and insert data to it.
As an example query, we'll return the top 10 uploaders by average views per video in a user-inputted year parameter.
WITH sum(view_count) AS view_sum,
  round(view_sum / num_uploads, 2) AS per_upload
SELECT
  uploader,
  count() AS num_uploads,
  formatReadableQuantity(view_sum) AS total_views,
  formatReadableQuantity(per_upload) AS views_per_video
FROM
  youtube
WHERE
  toYear(upload_date) = {year: UInt16}
GROUP BY uploader
ORDER BY per_upload desc
  LIMIT 10
Note that this query contains a parameter (year) which is highlighted in the snippet above.
You can specify 쿼리 매개변수 using { } together with the type of the parameter.
The SQL console query editor automatically detects ClickHouse 쿼리 매개변수 expressions and provides an input for each parameter.
Let's quickly run this query to make sure that it works by specifying the year 2010 in the 쿼리 변수 input box on the right side of the SQL editor:
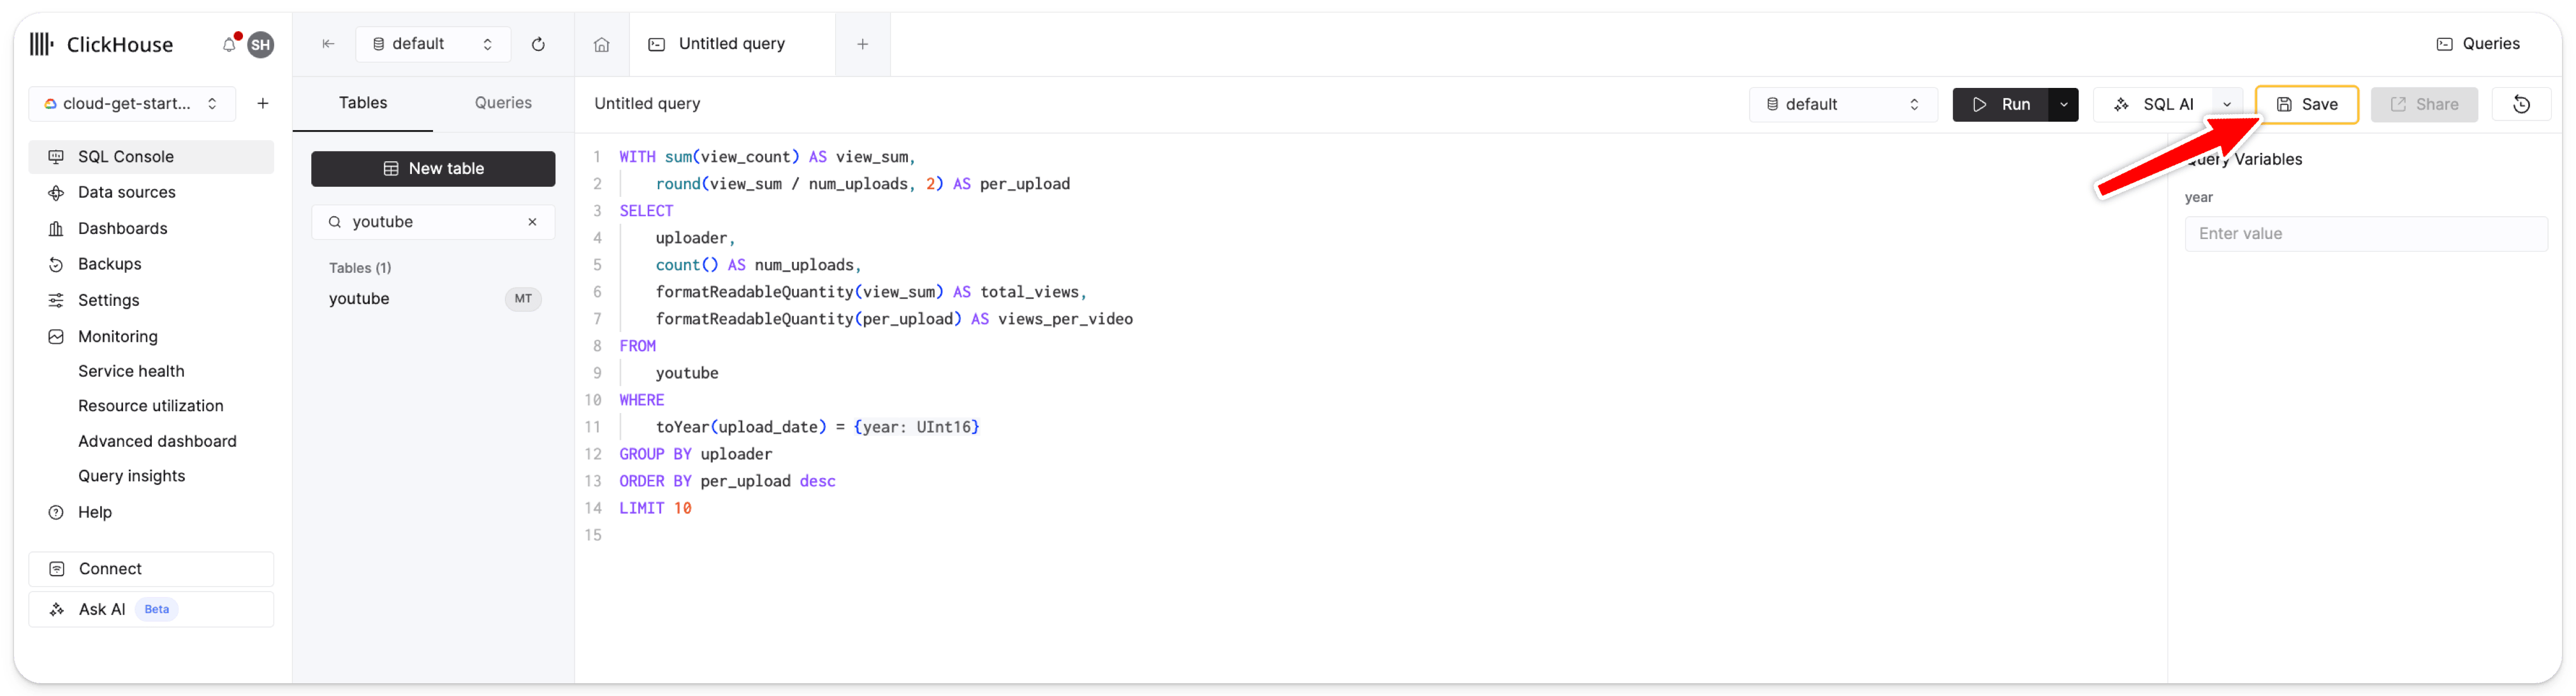
Next, save the query:
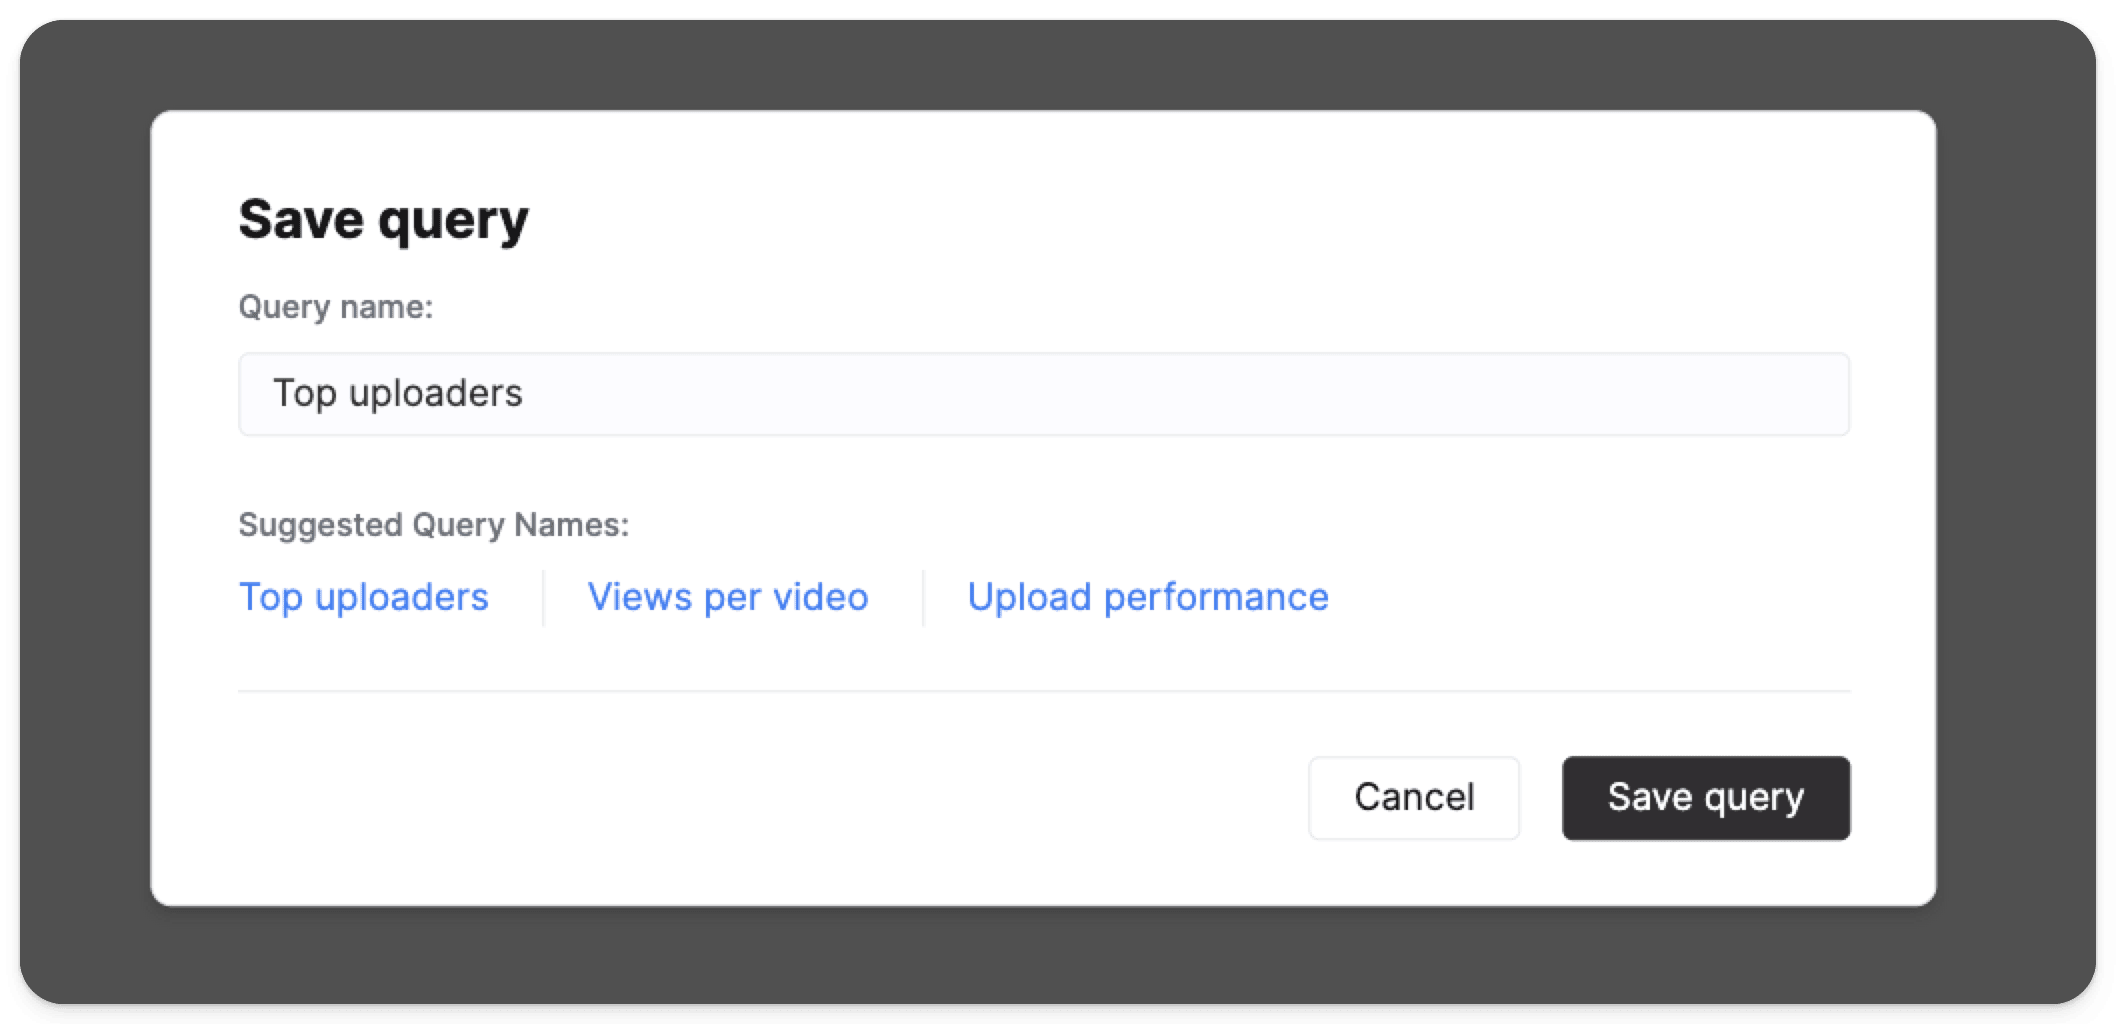
More documentation around 저장된 쿼리 can be found in section "Saving a query".
Configuring the Query API 엔드포인트
Query API endpoint can be configured directly from query view by clicking the Share button and selecting API Endpoint.
You'll be prompted to specify which API Keys should be able to access the endpoint:
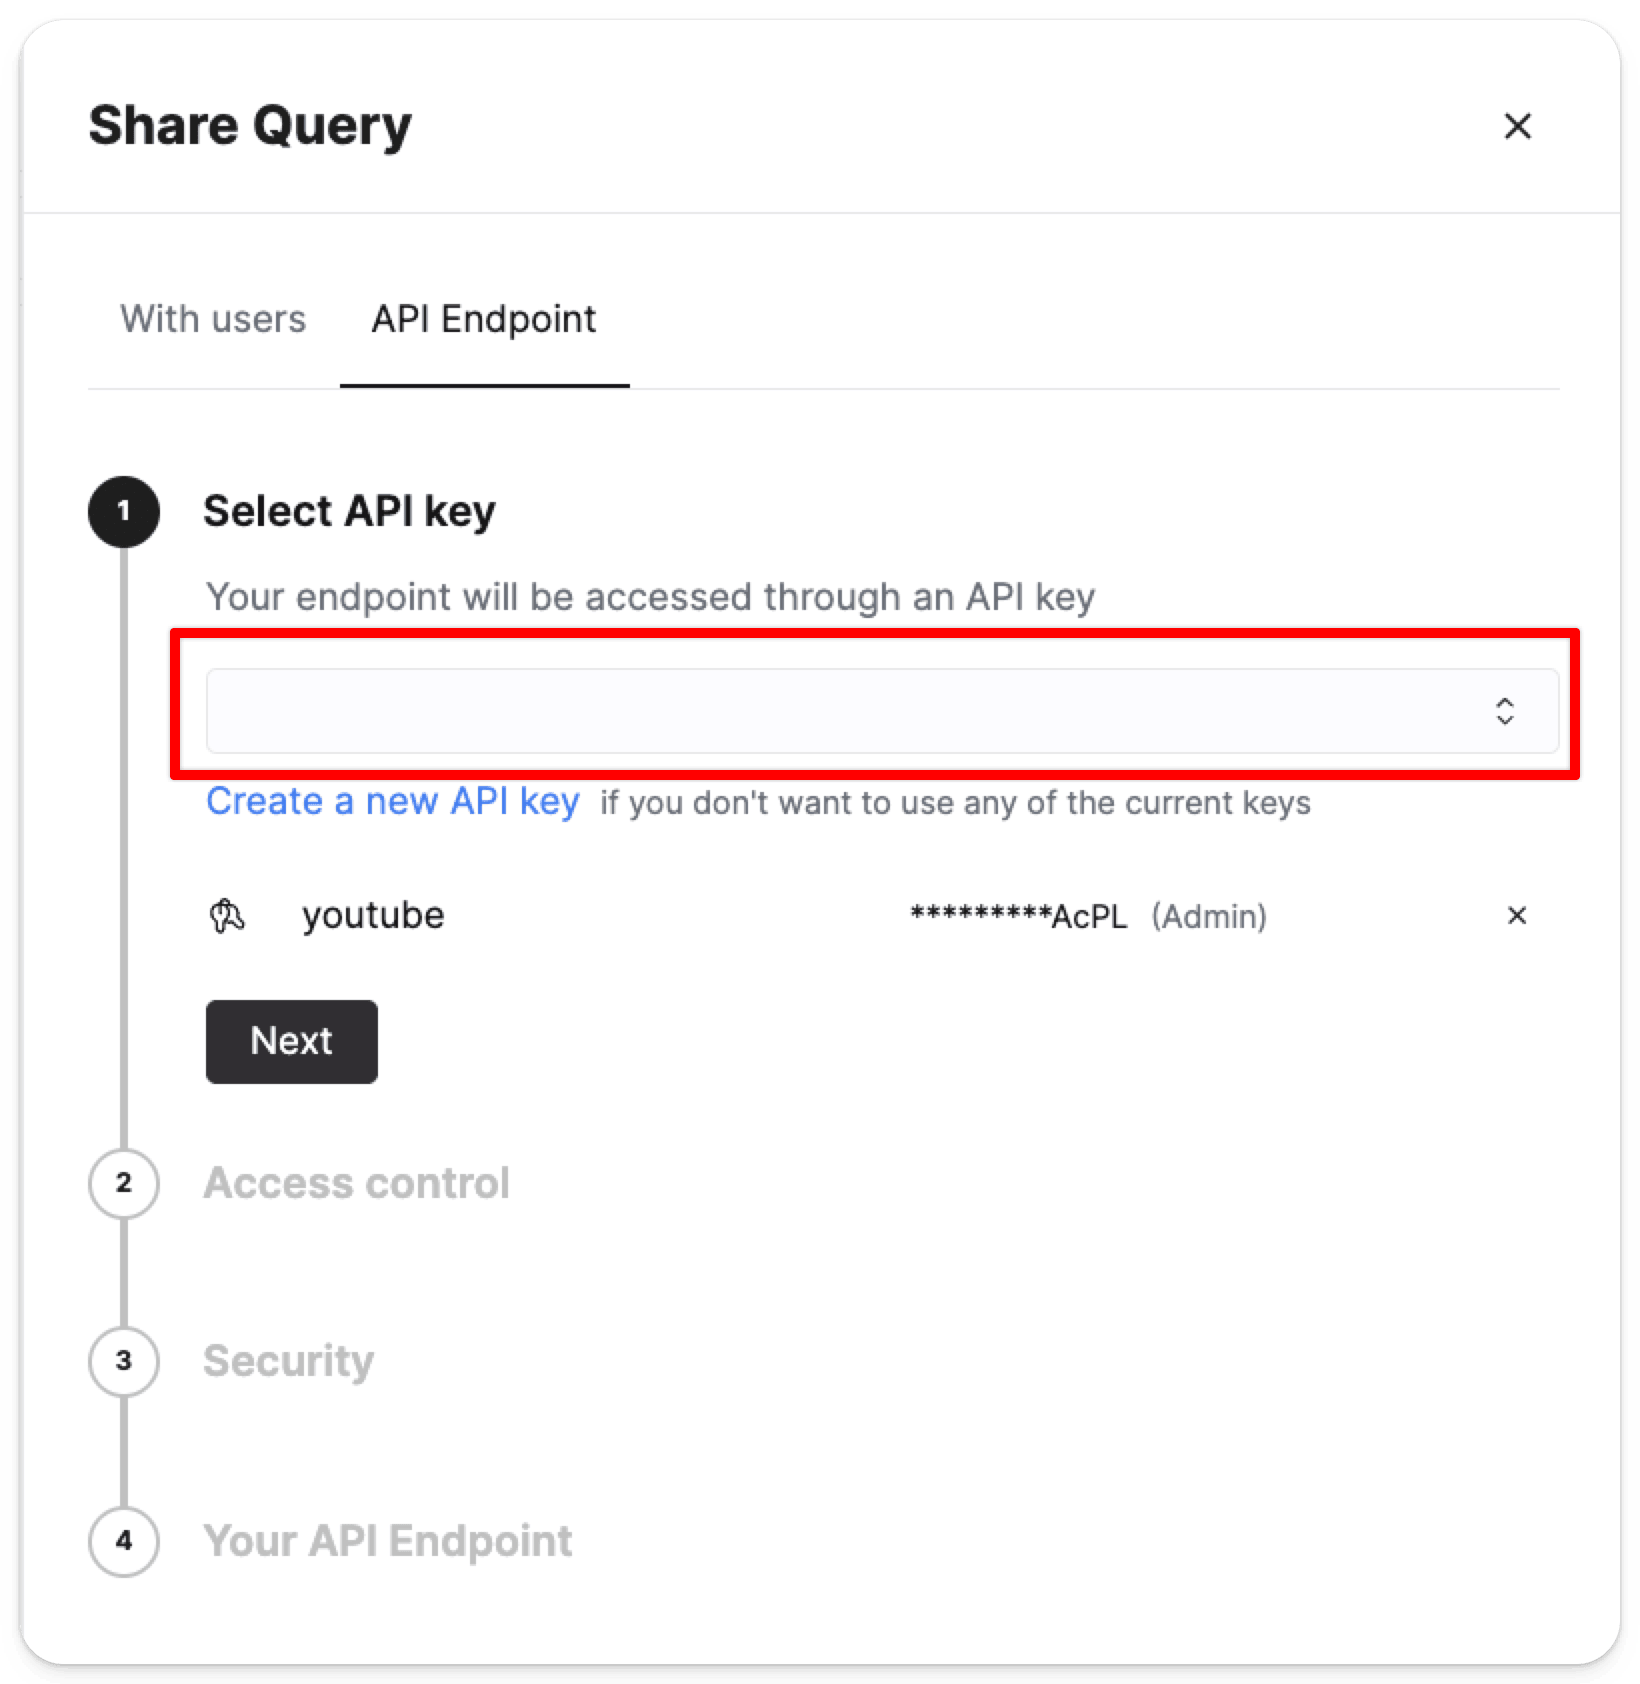
After selecting an API Key, you will be asked to:
- Select the 데이터베이스 역할 that will be used to run the query (
Full access,Read onlyorCreate a custom role) - Specify cross-origin resource sharing (CORS) allowed domains
After selecting these options, the Query API 엔드포인트 will automatically be provisioned.
An example curl command will be displayed so you can send a test request:
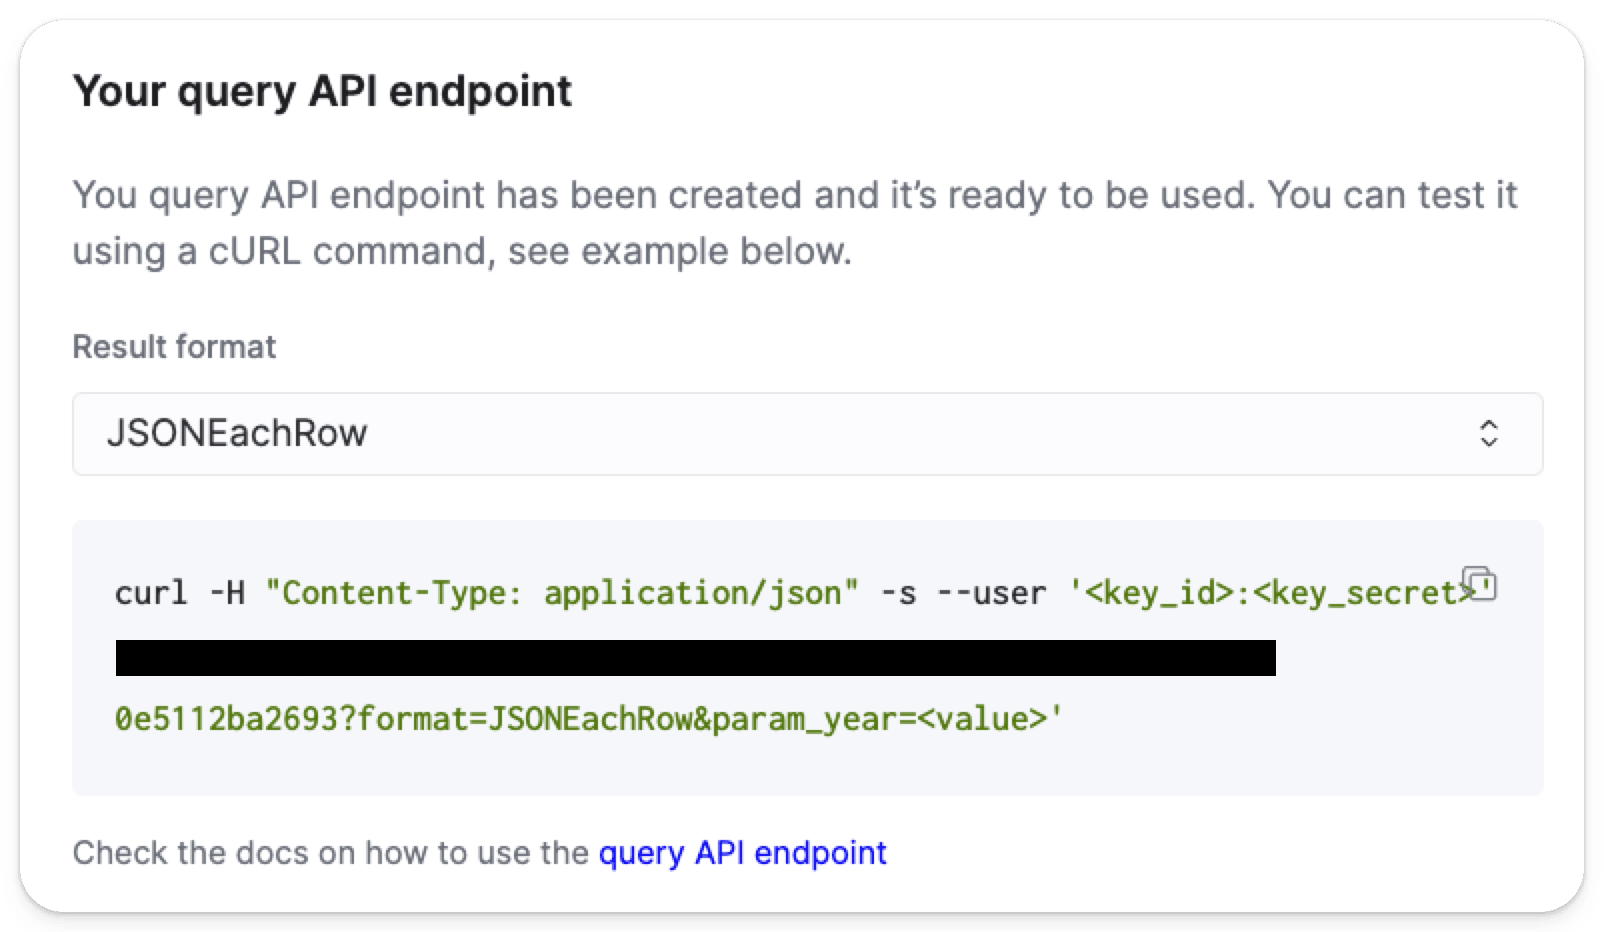
The curl command displayed in the interface is given below for convenience:
curl -H "Content-Type: application/json" -s --user '<key_id>:<key_secret>' '<API-endpoint>?format=JSONEachRow¶m_year=<value>'Query API parameters
쿼리의 쿼리 매개변수 can be specified with the syntax {parameter_name: type}. These parameters will be automatically detected and the example request payload will contain a queryVariables object through which you can pass these parameters.
Testing and monitoring
Once a Query API 엔드포인트 is created, you can test that it works by using curl or any other HTTP client:
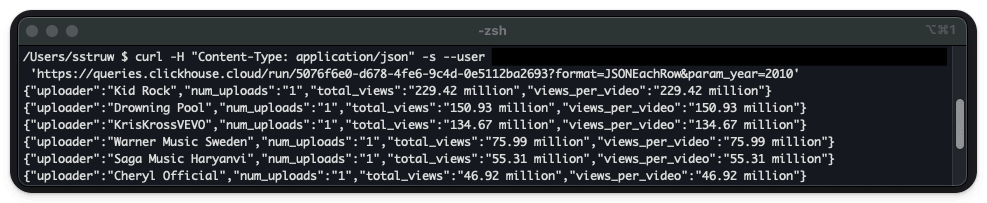
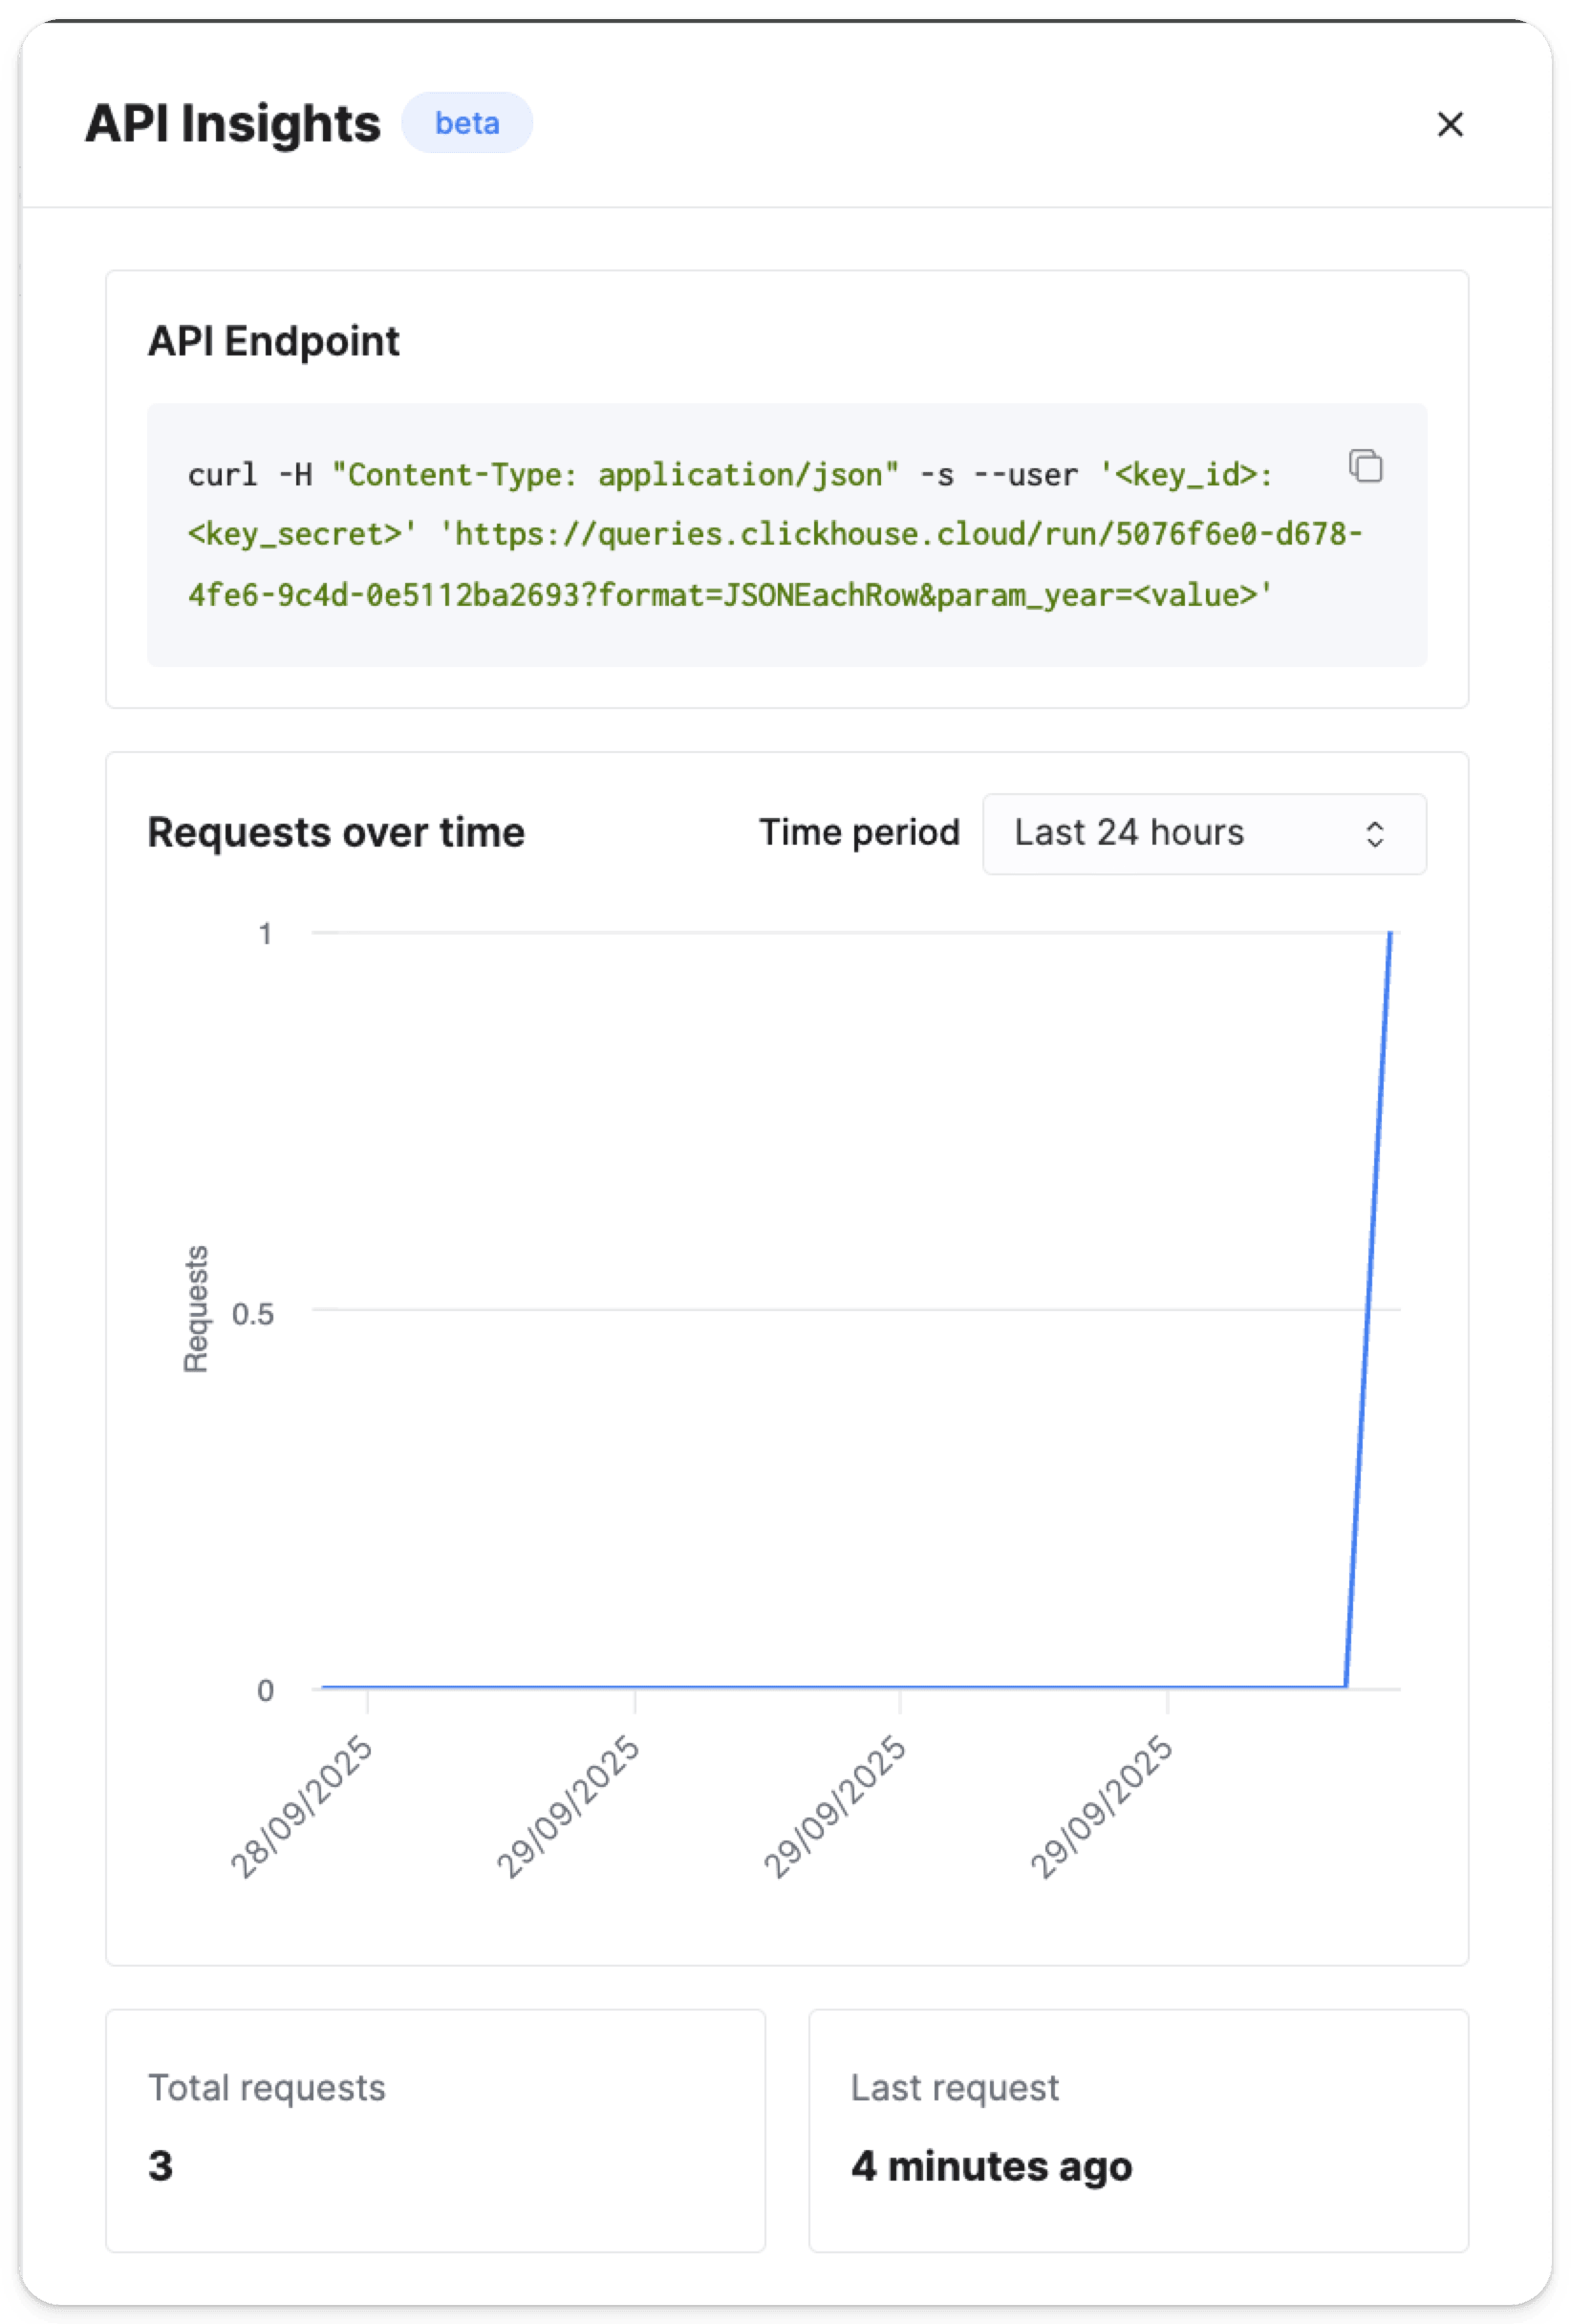
After you've sent your first request, a new button should appear immediately to the right of the Share button. Clicking it will open a flyout containing monitoring data about the query:
구현 세부 사항
이 엔드포인트는 저장된 Query API endpoint에서 쿼리를 실행합니다. 여러 버전, 유연한 응답 포맷, 매개변수화된 쿼리, 선택적 스트리밍 응답(버전 2만 지원)을 지원합니다.
엔드포인트:
GET /query-endpoints/{queryEndpointId}/run
POST /query-endpoints/{queryEndpointId}/run
HTTP 메서드
| 메서드 | 사용 사례 | 매개변수 |
|---|---|---|
| GET | 매개변수가 있는 단순 쿼리 | URL 매개변수(?param_name=value)를 통해 쿼리 변수를 전달합니다 |
| POST | 복잡한 쿼리이거나 요청 본문을 사용하는 경우 | 요청 본문(queryVariables 객체)으로 쿼리 변수를 전달합니다 |
GET를 사용하는 경우:
- 복잡하게 중첩된 데이터가 없는 단순 쿼리
- 매개변수를 URL 인코딩하기 쉬운 경우
- 캐싱이 HTTP GET의 의미 체계로 이점을 얻을 수 있는 경우
POST를 사용하는 경우:
- 복잡한 쿼리 변수(배열, 객체, 긴 문자열)
- 보안 또는 개인정보 보호를 위해 요청 본문을 사용하는 것이 바람직한 경우
- 스트리밍 파일 업로드 또는 대용량 데이터
인증
필수: 예 메서드: OpenAPI Key/Secret 기반 Basic Auth 권한: 쿼리 엔드포인트에 대한 적절한 권한
요청 구성
URL 매개변수
| 매개변수 | 필수 | 설명 |
|---|---|---|
queryEndpointId |
예 | 실행할 쿼리 엔드포인트의 고유 식별자 |
쿼리 매개변수
| 매개변수 | 필수 | 설명 | 예시 |
|---|---|---|---|
format |
아니요 | 응답 포맷(모든 ClickHouse 포맷 지원) | ?format=JSONEachRow |
param_:name |
아니요 | 요청 본문이 스트림일 때 사용하는 쿼리 변수입니다. :name을 변수 이름으로 바꾸십시오 |
?param_year=2024 |
request_timeout |
아니요 | 쿼리 타임아웃(밀리초, 기본값: 30000) | ?request_timeout=60000 |
:clickhouse_setting |
아니요 | 지원되는 모든 ClickHouse 설정 | ?max_threads=8 |
헤더
| 헤더 | 필수 여부 | 설명 | 값 |
|---|---|---|---|
x-clickhouse-endpoint-version |
아니요 | endpoint 버전을 지정합니다 | 1 또는 2 (기본값: 마지막으로 저장된 버전) |
x-clickhouse-endpoint-upgrade |
아니요 | endpoint 버전 업그레이드를 실행합니다(버전 헤더와 함께 사용) | 업그레이드 시 1 |
요청 본문
매개변수
| 매개변수 | 유형 | 필수 | 설명 |
|---|---|---|---|
queryVariables |
객체 | 아니요 | 쿼리에서 사용할 변수 |
format |
string | 아니요 | 응답 포맷 |
지원되는 포맷
| 버전 | 지원 포맷 |
|---|---|
| 버전 2 | ClickHouse에서 지원하는 모든 포맷 |
| 버전 1 (제한적) | TabSeparated TabSeparatedWithNames TabSeparatedWithNamesAndTypes JSON JSONEachRow CSV CSVWithNames CSVWithNamesAndTypes |
응답
성공
상태: 200 OK
쿼리가 정상적으로 실행되었습니다.
오류 코드
| 상태 코드 | 설명 |
|---|---|
400 Bad Request |
요청 형식이 올바르지 않습니다 |
401 Unauthorized |
인증 정보가 없거나 필요한 권한이 없습니다 |
404 Not Found |
지정한 쿼리 엔드포인트를 찾을 수 없습니다 |
오류 처리 모범 사례
- 요청에 유효한 인증 자격 증명이 포함되어 있는지 확인하세요
- 전송하기 전에
queryEndpointId와queryVariables를 검증하세요 - 적절한 오류 메시지와 함께 안정적으로 오류를 처리하도록 구현하세요
엔드포인트 버전 업그레이드
버전 1에서 버전 2로 업그레이드하려면 다음을 수행하세요.
x-clickhouse-endpoint-upgrade헤더를1로 설정해 포함합니다x-clickhouse-endpoint-version헤더를2로 설정해 포함합니다
이렇게 하면 다음과 같은 버전 2 기능을 사용할 수 있습니다.
- 모든 ClickHouse 포맷 지원
- 응답 스트리밍 capability
- 향상된 성능 및 기능
예시
기본 요청
Query API 엔드포인트 SQL:
SELECT database, name AS num_tables FROM system.tables LIMIT 3;버전 1
curl -X POST 'https://console-api.clickhouse.cloud/.api/query-endpoints/<endpoint id>/run' \
--user '<openApiKeyId:openApiKeySecret>' \
-H 'Content-Type: application/json' \
-d '{ "format": "JSONEachRow" }'fetch(
"https://console-api.clickhouse.cloud/.api/query-endpoints/<endpoint id>/run",
{
method: "POST",
headers: {
Authorization: "Basic <base64_encoded_credentials>",
"Content-Type": "application/json",
},
body: JSON.stringify({
format: "JSONEachRow",
}),
}
)
.then((response) => response.json())
.then((data) => console.log(data))
.catch((error) => console.error("Error:", error));{
"data": {
"columns": [
{
"name": "database",
"type": "String"
},
{
"name": "num_tables",
"type": "String"
}
],
"rows": [
["INFORMATION_SCHEMA", "COLUMNS"],
["INFORMATION_SCHEMA", "KEY_COLUMN_USAGE"],
["INFORMATION_SCHEMA", "REFERENTIAL_CONSTRAINTS"]
]
}
}버전 2
curl 'https://console-api.clickhouse.cloud/.api/query-endpoints/<endpoint id>/run?format=JSONEachRow' \
--user '<openApiKeyId:openApiKeySecret>' \
-H 'x-clickhouse-endpoint-version: 2'{"database":"INFORMATION_SCHEMA","num_tables":"COLUMNS"}
{"database":"INFORMATION_SCHEMA","num_tables":"KEY_COLUMN_USAGE"}
{"database":"INFORMATION_SCHEMA","num_tables":"REFERENTIAL_CONSTRAINTS"}curl -X POST 'https://console-api.clickhouse.cloud/.api/query-endpoints/<endpoint id>/run?format=JSONEachRow' \
--user '<openApiKeyId:openApiKeySecret>' \
-H 'Content-Type: application/json' \
-H 'x-clickhouse-endpoint-version: 2'fetch(
"https://console-api.clickhouse.cloud/.api/query-endpoints/<endpoint id>/run?format=JSONEachRow",
{
method: "POST",
headers: {
Authorization: "Basic <base64_encoded_credentials>",
"Content-Type": "application/json",
"x-clickhouse-endpoint-version": "2",
},
}
)
.then((response) => response.json())
.then((data) => console.log(data))
.catch((error) => console.error("Error:", error));{"database":"INFORMATION_SCHEMA","num_tables":"COLUMNS"}
{"database":"INFORMATION_SCHEMA","num_tables":"KEY_COLUMN_USAGE"}
{"database":"INFORMATION_SCHEMA","num_tables":"REFERENTIAL_CONSTRAINTS"}쿼리 변수와 JSONCompactEachRow 포맷 버전 2를 사용한 요청
Query API 엔드포인트 SQL:
SELECT name, database FROM system.tables WHERE match(name, {tableNameRegex: String}) AND database = {database: String};curl 'https://console-api.clickhouse.cloud/.api/query-endpoints/<endpoint id>/run?format=JSONCompactEachRow¶m_tableNameRegex=query.*¶m_database=system' \
--user '<openApiKeyId:openApiKeySecret>' \
-H 'x-clickhouse-endpoint-version: 2'["query_cache", "system"]
["query_log", "system"]
["query_views_log", "system"]curl -X POST 'https://console-api.clickhouse.cloud/.api/query-endpoints/<endpoint id>/run?format=JSONCompactEachRow' \
--user '<openApiKeyId:openApiKeySecret>' \
-H 'Content-Type: application/json' \
-H 'x-clickhouse-endpoint-version: 2' \
-d '{ "queryVariables": { "tableNameRegex": "query.*", "database": "system" } }'fetch(
"https://console-api.clickhouse.cloud/.api/query-endpoints/<endpoint id>/run?format=JSONCompactEachRow",
{
method: "POST",
headers: {
Authorization: "Basic <base64_encoded_credentials>",
"Content-Type": "application/json",
"x-clickhouse-endpoint-version": "2",
},
body: JSON.stringify({
queryVariables: {
tableNameRegex: "query.*",
database: "system",
},
}),
}
)
.then((response) => response.json())
.then((data) => console.log(data))
.catch((error) => console.error("Error:", error));["query_cache", "system"]
["query_log", "system"]
["query_views_log", "system"]쿼리 변수에 배열이 포함되어 있고 테이블에 데이터를 삽입하는 요청
테이블 SQL:
CREATE TABLE default.t_arr
(
    `arr` Array(Array(Array(UInt32)))
)
ENGINE = MergeTree
ORDER BY tuple()
Query API 엔드포인트 SQL:
INSERT INTO default.t_arr VALUES ({arr: Array(Array(Array(UInt32)))});curl -X POST 'https://console-api.clickhouse.cloud/.api/query-endpoints/<endpoint id>/run' \
--user '<openApiKeyId:openApiKeySecret>' \
-H 'Content-Type: application/json' \
-H 'x-clickhouse-endpoint-version: 2' \
-d '{
"queryVariables": {
"arr": [[[12, 13, 0, 1], [12]]]
}
}'fetch(
"https://console-api.clickhouse.cloud/.api/query-endpoints/<endpoint id>/run",
{
method: "POST",
headers: {
Authorization: "Basic <base64_encoded_credentials>",
"Content-Type": "application/json",
"x-clickhouse-endpoint-version": "2",
},
body: JSON.stringify({
queryVariables: {
arr: [[[12, 13, 0, 1], [12]]],
},
}),
}
)
.then((response) => response.json())
.then((data) => console.log(data))
.catch((error) => console.error("Error:", error));OKClickHouse 설정 max_threads를 8로 지정한 요청
Query API 엔드포인트 SQL:
SELECT * FROM system.tables;curl 'https://console-api.clickhouse.cloud/.api/query-endpoints/<endpoint id>/run?max_threads=8' \
--user '<openApiKeyId:openApiKeySecret>' \
-H 'x-clickhouse-endpoint-version: 2'curl -X POST 'https://console-api.clickhouse.cloud/.api/query-endpoints/<endpoint id>/run?max_threads=8,' \
--user '<openApiKeyId:openApiKeySecret>' \
-H 'Content-Type: application/json' \
-H 'x-clickhouse-endpoint-version: 2' \fetch(
"https://console-api.clickhouse.cloud/.api/query-endpoints/<endpoint id>/run?max_threads=8",
{
method: "POST",
headers: {
Authorization: "Basic <base64_encoded_credentials>",
"Content-Type": "application/json",
"x-clickhouse-endpoint-version": "2",
},
}
)
.then((response) => response.json())
.then((data) => console.log(data))
.catch((error) => console.error("Error:", error));응답을 요청해 스트림으로 파싱하기
Query API 엔드포인트 SQL:
SELECT name, database FROM system.tables;async function fetchAndLogChunks(
url: string,
openApiKeyId: string,
openApiKeySecret: string
) {
const auth = Buffer.from(`${openApiKeyId}:${openApiKeySecret}`).toString(
"base64"
);
const headers = {
Authorization: `Basic ${auth}`,
"x-clickhouse-endpoint-version": "2",
};
const response = await fetch(url, {
headers,
method: "POST",
body: JSON.stringify({ format: "JSONEachRow" }),
});
if (!response.ok) {
console.error(`HTTP error! Status: ${response.status}`);
return;
}
const reader = response.body as unknown as Readable;
reader.on("data", (chunk) => {
console.log(chunk.toString());
});
reader.on("end", () => {
console.log("Stream ended.");
});
reader.on("error", (err) => {
console.error("Stream error:", err);
});
}
const endpointUrl =
"https://console-api.clickhouse.cloud/.api/query-endpoints/<endpoint id>/run?format=JSONEachRow";
const openApiKeyId = "<myOpenApiKeyId>";
const openApiKeySecret = "<myOpenApiKeySecret>";
// 사용 예시
fetchAndLogChunks(endpointUrl, openApiKeyId, openApiKeySecret).catch((err) =>
console.error(err)
);> npx tsx index.ts
> {"name":"COLUMNS","database":"INFORMATION_SCHEMA"}
> {"name":"KEY_COLUMN_USAGE","database":"INFORMATION_SCHEMA"}
...
> Stream ended.파일에서 스트림을 테이블에 삽입하기
다음 내용으로 ./samples/my_first_table_2024-07-11.csv 파일을 생성하세요:
"user_id","json","name"
"1","{""name"":""John"",""age"":30}","John"
"2","{""name"":""Jane"",""age"":25}","Jane"
테이블 생성 SQL:
create table default.my_first_table
(
    user_id String,
    json String,
    name String,
) ENGINE = MergeTree()
ORDER BY user_id;
Query API 엔드포인트 SQL:
INSERT INTO default.my_first_tablecat ./samples/my_first_table_2024-07-11.csv | curl --user '<openApiKeyId:openApiKeySecret>' \
-X POST \
-H 'Content-Type: application/octet-stream' \
-H 'x-clickhouse-endpoint-version: 2' \
"https://console-api.clickhouse.cloud/.api/query-endpoints/<endpoint id>/run?format=CSV" \
--data-binary @-